Subject: The missing factor.
Date: Tuesday, June 15, 1999 8:10 PM
About six months ago I started noticing
a high speed miss in my 76 Nova with the 350 Target Master motor. I assumed that it was because of the spark
plug fouling which took place when my divorced choke linkage fell off. (the little clippy thing rusted to the point
of falling off.) It had started missing and popping in the headers something
terrible and even though I ran the piss out of it after fixing the choke I
thought the plugs were fouled beyond self-cleaning.
But,
(another one of those) the missing which was sporadic and only happened
above 4500rpm started to intensify and move down the rpm range. When It crossed the shift point for the 2-3
shift the miss was so bad that if you held full throttle the transmission would
not shift and the Nova would not go faster than 70 in second gear.
Slowly over the next few months the
problem became worse until now at full throttle the motor falls over at a
little above 2500 rpm.
I have put many miles (over half a
million) on GM cars with HEI ignition but have never had a failure so I am
innocent of knowledge as to the failure modes of these marvels of modern
engineering. The HEI in question is the
original job out of my old (scrapped) 77 truck which wore out the original 350
and mostly wore out the replacement crate motor which I transplanted to my
Nova. It has about 220k miles.
I put new plugs in the Nova and the
plug wires are good so what is the next step to isolating the problem and
fixing it for minimum bucks..
Thanks in advance for all of the good
advice..
Rick Draganowski
(looking for the missing factor)
To: ‘[Nova List]’ <nova@seas.smu.edu>
Subject: Progressive missing + culture
Date: Friday, July 16, 1999 8:54 PM
As the list knows (but probably don’t
really care) I have been having a progressive miss problem for months with my
76 Nova with the Target Master 350. I
and others had assumed that it was an ignition problem. Last 4th of July I put that
theory to the test. I had purchased a
ProForm distributor complete from Jeg’s as a Christmas present to the 400 motor
(to myself really) so that was available.
I had thought that replacing the tired old 77 HEI that had given me about
130 thousand trouble free miles would do the trick.
It made no difference at all.. The miss has progressed to the point that
the motor would not generate enough vacuum to even try to open the secondaries
of the Q-jet and the sound of the banging in the headers was pitiful..
Sooo I surmise that it is
carburetion. Once before at the dawn of
MTBE in gasoline (about 1985) I had developed similar problems in my old white
truck (with this same motor and carb) and the problems turned out to be a float
which had sunk..
The Methyl Tertiary Butyl Ether used in
modern gasoline is bad for most plastic and rubber parts. The crazy gas price increases here caused
our local suppliers to switch to California sources where all the gas has 11%MTBE. (Oregon gas has very little) I believe the
tank of CalGas which increased my performance due to the higher octane had
sabotaged my Q-Jet. The missing started just about this time..
So I have been hanging fire on
replacing the carb with a known good Q-Jet which came off my 400 motor due to
pressing business.. I am about half way
there...
I expect a lot of the problems with the
Q-Jets from older vehicles is due to the incompatibility with the modern crappy
gasoline..
We will see what is up when I do an
autopsy on the carb....
More to come..
Rick Draganowski
(Cultural moment follows)
The Clod & the Pebble
Love seeketh not Itself to please,
Nor for itself hath any care;
But for another gives its ease,
And builds a Heaven in Hells despair.
So sang a little Clod of Clay,
Trodden with the cattles feet:
But a Pebble of the brook,
Warbled out these metres meet.
Love seeketh only Self to please,
To bind another to Its delight:
Joys in anothers loss of ease,
And builds a Hell in Heavens despite.
William Blake
Subject: Missing Factor Chapter Three
Date: Sunday, August 01, 1999 7:55 PM
Today I finished the job I started back
on the 4th of July. (not
much time for Nova work here) I swapped
the old faithful Q-Jet with the fancy just professionally rebuilt Q-Jet that
came with my 400 motor..
At first I had a sinking feeling as the
missing continued. “Give it time” I
thought to myself as the plugs were pretty badly fouled from running with the
too rich mixture.
I could tell that the missing was
easing and getting higher in the rpm range.
I ran for a little more (pretty hard full throttle) and the rpm finally
climbed to the range which allows the transmission governer shift to kick in at
4400 rpm at full throttle. The push in
the back was a welcome feeling.
The missing continues but is getting
better the more I drive. Exactly the
same thing happened when I had the choke foulup and the plugs slowly cleared
themselves. But (another one of those
damn things) the plugs will never be as good as they should be and need
replacing again.. Argggghhhhh!!!!!
Sooo the Q-Jet probably does have a
sunk float as all of the circumstantial evidence points in that direction..
Damn that MTBE!!!
It has been months since I enjoyed the
feeling of driving a v8 Nova and I really missed it.
It has been a wonderful day.. (and the clouds went away and it was 65 and
sunny too....)
I need my Nova ride to be at ease in
the day to day world..
Rick Draganowski
(going fast in rusty Nova)
Subject: Missing Factor Revealed!
Date: Sunday, August 22, 1999 8:38 PM
As the list knows I have been fighting
a progressively worsening miss in the old 350 truck motor in my 76 Nova.
It started missing above 4000 rpm about
6 months ago and the miss worsened and came slowly down the rpm scale until the
poor motor would not allow the TH350 to shift at full throttle or even open the
secondaries on the Q-Jet.
To troubleshoot first I swapped out the
HEI with the new Proform high performance distributor I got for the 400 motor
last Christmas as it really seemed like an ignition problem..
Made no difference at all..
Then I swapped the Q-Jet with the known
good (freshly rebuilt by a speed shop) Q-Jet I have for the 400.
It seemed to help a little but it is
very subjective.. So I suspected the
spark plugs being fouled.. Still
missing...
Figured out how to twist my body into
strange shapes and changed out the sparkplugs without removing the headers. (I
should have videotaped it for Funniest Home Video’s)
No change at all and still missing
badly..
Then I suspected corrosion in the
connections causing low voltage to the HEI.
Checked it an it had 14 volts..
Having eliminated all other
possibilities only the cam and or valve train is left..
So today I pulled the rocker cover on
the drivers side, pulled the hot lead off the HEI, and cranked the motor while
watching the rockers..
I have what must be the flattest cam
ever seen in small block history. Only
two rockers looked like they were moving properly and at least 3 were moving
less than 1/16 inch at the valve..
FLAT! FLAT! FLAT!
This motor was a new Crate Target
Master back in 1979. Hadn’t GM figured
out the flat cam problem by then??
RATS!
So my plan is to pull the Edelbrock
Performer cam out of the 400 and stuff it into the 350 in the car.. What fun!
(Not!) I will be careful to keep
the lifters with the proper lobe...
Not driving the Nova everyday is making
me mean and cranky.. I gotta fix it
even though it is a rusty old thing..
Love is blind..
I will also modify the vacuum advance
(limit it to 10 degrees) and put the 200k plus HEI back on and the antique
Q-Jet..
I have the Edelbrock Performer manifold
for the 400... Hmmm... Maybe if I saved up a little I could get a
Performer RPM for the 400 and put the Performer on the 350 and loose the cast
iron intake in the grass somewhere....
Should I?? Is the Performer RPM much better???
Rick Draganowski
(relieved but aggravated)
Subject: Forces of Darkness, Forces of Light
Date: Saturday, August 28, 1999 8:39 PM
As the list may know because of my long
winded stories I have a very flat cam in the 350 motor in my Nova.
I have a perfectly good Edelbrock
Performer cam in my 400 motor (only 5000 miles on it) which I intend to put
into the 350 getting me back on the road in my Nova. (a much desired condition)
So this is where a reprise of the
oldest story in the world starts..
On my right shoulder there is a tiny
Angelic figure insisting quietly that I pull the motor out, put it on the
stand, take the heads off and inspect them, pull the pan and check the bearings
and replace the oil pump. Etc..
But...
On my left shoulder there is a tiny
devilish figure (who strangely reminds me of myself as a child) whispering to
just slap the cam in with the motor in the car, don’t bother with the
heads. don’t aggravate youself removing
the headers.. Just get your Nova going
right away with a good cam.. After all
you are too busy to take the time needed to do it right and the 350 motor is
not your favorite since the wonderful 400 came into your life..
Don’t even bother to pull the pan..
Just pry it down a little and gom it back up with the Ray Buck anti-leak
vaccine (RTV!)
I am balanced between these opposing
forces and ask the list for opinions..
I am starting on the project one way or
another pretty soon..
Rick Draganowski
(Mr. Indecision.....)
Subject: Flat Cam Project day 1
Date: Sunday, August 29, 1999 7:45 PM
Step one of the Flat Cam Project has
been done.
I put the valve covers back on and
drove my poor Nova to the work area.
There I removed the battery cable and jacked the front end up and put
jackstands under the subframe right behind the A arms.
More to come..
I still don’t know if I am pulling the
motor or not. The first steps are the
same..
Rick Draganowski
(Mr. Indecision)
Subject: Flat Cam Project day 2
Date: Monday, August 30, 1999 6:54 PM
I sent the following message yesterday
but did not see it on the list.
Anyway the next few steps in the
project were done today.
1) Removed
the radiator and hoses. (disconnected the tranny cooling lines with tubing
wrench)
2) removed
the alternator and brackets
3) unbolted
and hung on a wire hoses connected the power steering pump
4) removed
the waterpump/fan assembly. (noticed
one of the mounting holes had coolant coming out of it. must use gasket sealer on these 4 bolts when
I reassemble)
I put all mounting hardware back into
the threaded holes they came from (when possible) so I would not have to keep
track of loose bolts, washers, and nuts.
More to come..
Rick Draganowski
(pretty much made up my mind on how
much to do. Will send another post on
that subject)
Subject: Flat Cam Project day 3
Date: Tuesday, August 31, 1999 9:54 PM
Today I got a late start so half of the
time I was in the dark (not really) here is the progress.
1) removed
the grille (4 phillips screws and 2 hex head)
2) removed
the hood latch assembly and vertical bracket to make room for the cam to come
out.
3) Removed
the crankshaft pully
4) using the
right tool (vibration damper puller) pulled the damper
I took a scan of the damper (worrying
mightily about breaking the glass on my scanner) and sent it along in another
letter.
I am encouraged by the amount of room
under the front of the motor on the 76 as I visualized a much worse time than I
forsee. I may be able to drop the pan
enough without jacking up the motor to slip a one piece pan gasket in. A lot of crawling around on the ground for
an old fat cripple but it may be worth it..
Tomorrow the cam drive cover comes off
and I am seriously thinking about re-using the stock timing chain..... That leaves the cool Edelbrock roller chain
for the 400... Factory spec is: 5/8”
or more slack on the chain calls for replacement..
More to come..
Rick Draganowski
(having more fun than should be legal)
Subject: Flat Cam Project day 4
Date: Wednesday, September 01, 1999 7:54 PM
Really squeezed for time today so only
pulled the Q-Jet off. I will be getting
after the distributor and intake manifold next. Then I jack the Nova up higher and go for the oil pan drop
trick..
More to come..
Rick Draganowski
(not gonna try the one-piece seal, just
gonna gom up the old gasket with RTV)
Subject: Flat Cam Project day 5
Date: Thursday, September 02, 1999 7:47 PM
Today I got an early start and spent 3
hours to make up for day 4 being so pitiful.
I took the Rustpuppy off the jackstands
so I could reach stuff on the motor.
1) Removed
sparkplug wires and distributor cap.
2) Removed
distributor
3) pulled the
valve covers back off.
4) removed
the intake manifold.
It does seem to weight 70 lbs at arms
length lifting with one hand (cast iron Q-Jet) but it is not. Last time I put this manifold on a year ago
I experimented with the rubber end seals.
They worked like a charm and look as if they could be reused. Not a drop leaked.. (probably never happen again) I used premium
gaskets so they even look reusable (not! the little beads are flat).
5) Removed
the rockers and pushrods (bagged and tagged them)
6) Removed
the lifters (bagged and tagged too)
Bagging and tagging took almost as long
as the actual work but I want to be able to do an accurate analysis of exactly
what happened.
On first look (all the lifters were
thrashed) it just looks like a really soft cam which went totally to hell when
I started hot rodding the old junk motor.
We will see..
The worse lifters had 1/8 inch deep
depressions gnurred into them..
More details to come in the final “Post
Mortem Report”.
More to come..
Today was more fun that I thought was
still possible at my age..
Rick Draganowski
(bet I will see 15’s with the Edelbrock
Performer cam in Rustpuppy)
Subject: Flat Cam Project day 6
Date: Friday, September 03, 1999 8:03 PM
Had another late start but pressed on
regardless..
The first thing today was to put ol’
Rustpuppy back up on jackstands so I could wriggle under when the time
comes. Then:
1) removed
fuel line (from pump to carb)
2) removed
fuel pump but left the plate and pushrod in place.
3) removed
the 4 front oil pan bolts. (the easy to
reach jobs)
4) removed
all the bolts and the timing pointer from the timing cover.
This motor came with a neat bolted on
timing pointer which rests against a bump on the cover and is held on by two of
the cover bolts. This is the way all
the covers should be made so that they would be universal..
Started prying on the cover (just
hoping for a miracle I guess) and the damn thing just popped off easy as
pie. (getting the cover off of the
painted over locating pins was the hardest part.
So there I sat (sitting on a folding
chair in front of the car and reaching in..) dumbfounded with a stupid look and
pretty happy.
But, (always a but) what I saw now
exposed to daylight for the first time in 20 years was a horrible sight. The timing chain and crankshaft sprocket
looked about like what a 100k set should look like but the chain was hanging
slack, slack, slack. I have never seen
a chain this loose.
The reason was obvious. A newfangled molded plastic and aluminum cam
sprocket. The damn yellow brown teeth
of the damn part were almost worn completely off and the chain was almost ready
to fly off. Rubbing against the inside
of the cover was the only thing that kept it in place.. What a poor engineering decision by someone
back in 1979.. Damn! (And that damn plastic and aluminum and
monstrosity will cause me more trouble before this is over.. Wait and
see...)
But I was ahead of schedule and the cam
would be out in minutes (not!)..
So I calmed down and took the three
bolts that secure the cam sprocket to the cam out. then I carefully tried to lift the sprocket off as I had seen done
and done myself so many times..
It was firmly immovably stuck on the
front of the cam. Tapping on the end of
the pin just drove the pin in deeper but did not move the sprocket. Then I thought of pulling the cam out just a
little and putting something behind the sprocket and driving the cam back with
a long socket and hammer. That would
have worked..
But, I pulled a little too far and the
cam fell down out of the bearings. So I
sat down to consider my options and review some of my vocabulary.
From where I sat I could see that the
slack in the chain may be enough to allow prying the chain off the crank
sprocket with a thin bladed screwdriver and freeing up the mess which has
developed..
A few moments of careful prying and the
chain was off in my hands. Progress is being made.. Happy, joy..
Then It was an easy matter to restore
the cam to the center of the bearings and slowly and carefully withdraw
it. I did not need bolts for handles
since the damn cam sprocket was still firmly attached..
It was out!
It’s appearance was as bad or worse
than I visualized when I watched the rockers and tried to imagine the mess
inside..
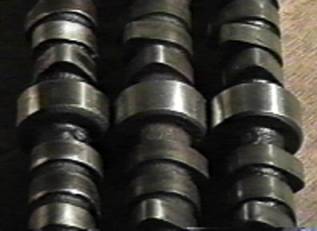
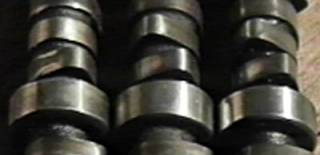
7 flat lobes. And 9 shabby looking lobes.
And the quality control on this cam was so poor that one of the journals
was only about half width on one side because the casting was poorly
done.. What a bummer... The GM supplier division of Crane cams did
not make this sorry specimen.. I bet
that a unnamed and unknown supplier either in Mexico or Central America had and
lost a contract with GM just about the time this puppy rolled off the assembly
line down in Mexico..
After considering the spectacle the cam
presented I decided to remove the damn sprocket. I had to hit it with a hammer 5 times (pretty hard) before it
went flying off. There was a machined
recess on the end of the sprocket which centers the sprocket on the cam and it
was machined so tight that I am sure the sprocket was hammered on at the
factory.. So there you have it..
On a more cheerful note. On going back to the now camless motor I
wiped off the front cam bearing and inspected it. Not too bad. A nice even
gray appearance, and no scoring or metal deposits. A few tiny pits but nothing to worry about. I peeked inside with
a flashlight and the others looked pretty good as well as I could see. Thank
God for oil filters... I could feel the
bearings as I was removing the cam and they seemed snug and felt right. So I will just pop in the new (used)
Edelbrock Performer as part of my Labor day celebration..
Another fun and productive day..
Rick Draganowski
(metal good, plastic bad..)
Subject: Odds and Ends
Date: Saturday, September 04, 1999 7:04 PM
No progress on the Flat Cam Project
today. I seem to have physically
overextended myself during yesterday’s excitement and have to do my work from a
sitting position today. (I can walk,
but just barely..)
Oh well...
On the flat cam front I had worked up a
possible theory before removing the cam as to why it failed so miserably. The theory is that it was not a new cam to
begin with but a regrind with most of the hardening ground off.. Inspection of the cam today seems to
indicate that that is a real possiblity.
The base circle on a known good cam I bagged out of an old 305 motor
shows the stock base circle at 1.332 inches.
Old flattie mikes out at 1.265 a
difference of 0.067 inches..
Hmmmm... Just like someone
reground a worn cam.. More to come on
this issue later...
Now for something completely
different. I bought the neato Proform
performance HEI from Jeg’s last Christmas and I used it in the troubleshooting
of ol Rustpuppy’s flat cam problem. Today I dug around in the Proform distributor to check out what
the details were.. The weights are cool
(pretty heavy) with medium to light springs.
But (a really big BUT) the vacuum
advance can is a POS. It has a soft
spring, is non-adjustable, and is cranking 25 degrees of advance. I guess that the company thought that at the
stock static timing setting the overdone vacuum advance would make the wannabe
rodders car feel “peppy” or something. Not exactly race ready...
I swung over to the Jeg’s web site to
send an E-Mail bitch but they say that you cannot send comments to them via
E-Mail. You have to call and talk to an
“order taker” to get through to them..
Kind of a bummer.. And after all
the good things I said about them too...
Oh well, the adjustable can from Accel
or Crane is less than 30 bucks or I can go with my old truck can with the hard
spring and 15 degrees (soon to be reduced to 10)
More to come..
Rick Draganowski
(having fun, just slower..)
Subject: Flat Cam Project day 7
Date: Saturday, September 04, 1999 8:36 PM
I couldn’t hold myself back and wound
up putting about 2 hours into the project. (mostly sitting time)
I moved some stuff in my shop in
preparation to tearing into the 400 motor sitting in the corner and stumbled
across the timing chain and cam sprocket which I salvaged from an old 305 motor
a few years ago. It was laying around
near where I had kept the scale I used to weigh small block parts a few years
ago. When I looked at it I was amazed
to find that it was an almost new factory GM set with a cast iron cam sprocket
and the neat sintered steel crank sprocket with a fine “Made in USA” Morse
chain in perfect condition. I guess it
just fell out of the sky. (never throw
nuthin away and it pays sometimes) The crank sprocket was still on the rusty ol
crank in the other end of the shop (late model full circle seal 305 crank)
So In a sitting position and with the
aid of a propane torch, some WD40, and a two arm puller with a custom aluminum
crank protector bearing I rassled the crank sprocket off. Had a hell of a time holding the crank so I
could really put the torque on the puller but I managed. (lotsa upper body strength)
The whole timing set cleaned up so
purdy that it looks like I just picked it up at the GM parts window..
Encouraged and a little bit reckless I
went out to the Rustpuppy and racked myself up a bit more pulling the old
“Hecho in Mexico” crank sprocket off.
The Mexican chain did say Morse
but no mention of country of
origin. It also looks like a slightly
different design that can be assembled by hand and it was. You could see the variations in the way the
pins were peened and the Morse was hand stamped also. A really labor intensive way to make a timing chain..
So real progress has been made and
perhaps tomorrow the 400 will be opened up and a Camectomy performed.. I am leaving the 400 in the low motor stand
so I can work on it sitting on my folding chair..
More to come...
Rick Draganowski
(still having fun..)
Subject: Flat Cam Project day 8
Date: Sunday, September 05, 1999 10:03 PM
A person whom I regard highly told me
to take it easy today so I took it pretty easy.
The only strain was putting the choice salvaged
crank sprocket back on ol Rustpuppy. It
was not a big deal as I carefully deburred the sprocket bore and lubricated the
crank nose before starting. (just motor
oil) First I slid it on as far as I could by hand making sure the key was in
the center of the keyway. Then using
the hardwood handle of my wire brush as a punch and a 16 oz ball pein hammer I
started to alternately drive one side and the other till the wooden driver
would push no farther. Then using a
stainless rod (a soft 304 alloy) I continued driving. About 3 hits on one side with the rod as close to the crank as
possible and then 3 hits on the other side.
After many many hits I could feel and hear a difference as the sprocket
bottomed against the step in the crank.
Six more hits on each of all four compass points verified the puppy was
in..
Then I moved to a sitting posture and
enjoyed the fine weather as I carefully scraped all of the gasket residue from
the timing cover and the intake manifold.
I thought of Rob Roberson’s 355 project while scraping on the ol cast
iron Q-Jet manifold that Rustpuppy wears and decided to give him trouble if he
didn’t pull the manifold and port match it to those wonderful heads he has on
his motor...
Then as darkness fell I went into the
shop and finished clearing away around the stored 400 motor..
Rats!,
I mean mice! had been in the lifter vally on the cloth covering it and
had been taking bits of the toilet paper I had stuffed in the ports and were
starting to build a nest. Mice in my
mouse motor. What will they think of
next..
The toilet paper stuffing was to keep
gasket scrapings out way back when I was cleaning up this motor to put in
without disassembling it to inspect everything and get a proper valve job and
pocket porting.. But now it will be
done right as it will have a good home in Junkyard Dawg instead of Rustpuppy.
I removed the rodentia spoor and nest
fragments and started work on the 400.
I have a 250 watt incandescent
spotlight shining on the 400 and it is a sight to see..
Much nicer inside than the old 350..
1) removed
water pump
2) removed
crankshaft pully
3) pulled off
drivers side valve cover
4) removed
all the rockers, pushrods, and lifters and bagged and tagged them. The lifters have to be matched up with the
proper cam lobe when I put the cam into Rustpuppy’s motor.
I fooled around with some E-Mail in
between tasks and am writing this and calling it a day..
BTW all of the lifters looked almost
new and they are gonna be fine in the other motor...
Happy happy, joy joy..
More to come..
Rick Draganowski
Subject: Flat Cam Project day 9
Date: Monday, September 06, 1999 8:55 PM
It was a good news/bad news kind of a
day. First all the good news.
I pulled the other (passenger side)
valve cover off the 400 motor and went to work on the right bank rockers, push
rods, and lifters. This part went
without a hitch. The rocker studs,
rockers, pushrods and lifters all looked terrific and happiness was
growing.
When all these parts were safely tagged
and bagged I went to work on the front of the motor. The vibration damper came
off without a hitch (it help to have the proper tool) and then the timing cover
came off slick as a whistle. (The
previous owner had taken it off and replaced it twice already. In the truck. Once it was to replace the
stock cam with an Edelbrock Performer, and the second time to replace the Edelbrock
Performer which wound up with 2 flat lobes with another one.)
With the cover off my eyes were treated
to:
1) perfectly
clean inside cover area..
2) perfect
condition double row timing chain with french locks..
Not the chain I would chose (solid pin
instead of true roller and double instead of single row) but a perfectly
serviceable part and Edelbrock charges almost 50 bucks for it...
Excitement growing so my hands were
slightly trembling I hammered back the french locks with my trusty ball pein
and a medium sized screwdriver.
Then the three bolts were out in a
twinkling of an eye. (they were not torqued enough)
Holding the cam sprocket in both hands
I pulled ever so gently. Then the
sprocket and chain were off and into my hands.
(like it is supposed to)
Ahhh..
The beautifully finished end of the
Performer cam was exposed. I went back
into the other end of the shop and got two 5/16NC bolts about 2 ½” long and was
back in a flash. Threading the bolts
into the tapped holes in the cam for handles I pulled and rotated slightly and
the cam started it’s way out.
Carefully supporting it and lifting it
back to center to clear the lobes I slowly withdrew the cam from the motor.
It was out safely! I wiped the oil from the cam and carefully
inspected it under the glare of the 250w spotlight and could see no flaw. It was a perfectly broken in cam which the
lifter inspection testified to in advance..
The cam is a beauty compared to the
stock GM cam and cannot be compared in any way to the “Flat Cam from Hell” I
had just pulled out of Rustpuppy..
Below are a couple of pictures of three
cams. From left to right they are:
Mexican Target Master, Stock 305, Edelbrock Performer 400.. You can see the left one is a little off…
The nasty thing is even worse in real life..
So far nothing but good news followed
by more good news..
But, (told you at the beginning) the
bad news started as soon as I turned back to the motor to examine the cam
bearings. I had noticed that the cam
bearing clearances seemed tighter that they should be when I was pulling the
Performer.
I could see why. There were score marks all the way around
and when I felt the finish of the bearing with my finger I could feel an
ominous roughness in the top part of the bearing adjacent to the oil hole.
An inspection mirror showed imbedded
metal particles and other damage (smearing and chipping) from the metal which
had been In the oil.
I cannot figure how it may have gotten
through the filter unless the oil filter was defective in some way.. Or maybe it was clogged up to the point
of allowing oil to bypass.. Damn!
Oh well..
If the front cam bearing is this bad I
can be sure that all of the bearings in the motor were trashed and that I am
going to have to do a complete teardown and rebuild.
The 400 motor is gonna cost a lot more
than I thought..
Don’t it always..
Rick Draganowski
(I wonder what is next...)
Subject: Flat Cam Project day 10
Date: Thursday, September 09, 1999 7:37 PM
Been busy on non-Nova stuff since
Monday but did a little on Tuesday (got a bolt and stack of washers for
installing vibration dampers).
Today some real progress was made. Cleaned up and installed the Edelbrock
Performer cam into Rustpuppy. The
reclaimed stock GM timing chain went on easily and fits and looks like a new
one. That is where I was when darkness
intervened. The cam fits real nice and
seems right at home..
More to come..
Rick Draganowski
(gonna be in the 15’s for sure...)
Subject: Flat Cam Project day 11
Date: Friday, September 10, 1999 6:31 PM
A mixed bag of work today. first I did scraping and wirebrushing on the
timing cover, tdc pointer bracker, intake manifold, fuel pump, and new (to
Rustpuppy water pump).
Then a quick rattle can paint job on
them all.. While the acrylic enamel was
drying (Oldsmobile Engine Blue) I salvaged the studs and the heater outlet plug
(Rustpuppy has no heater) from the leaky waterpump Rustpuppy has been wearing
for the last 4 years.. (it had an
annoying little leak at the top of the tin cover on the back of the pump) I used the double nut technique on the studs
and they came out easier than I expected..
Then I finished scraping and cleaning
the gasket surfaces on the motor at the timing cover, heads and vally, and fuel
pump mount.. More stretching and
bending for my old bones.. It is a lot
easier with the motor on a stand.. Next
time for sure...
Then I slid in all of the lifters that
match up with the Edelbrock cam and they fit fine and felt happy (there was no
varnish or sludge in this motor as I have been using Marvel Mystery Oil in it
for the last few years) The 400 is full
of varnish and a bit of sludge..
Hmmmm
I started installing the original
rocker arms and pushrods in the locations they came from and stopped after
doing cylinders 1 and 3 since this would be a lot easer with Rustpuppy off the
jackstands and on her tires.. (easier
reach) I gotta put the fuel pump and
timing cover on before I take her off the jackstands so I diverted to the fuel
pump.
It went on easily (not! they never do)
You just have the motor on TDC Number 1 firing stroke, push the pushrod back a
bit with needlenose pliers and slip in a steel pocket rule to catch the
pushrod. Then take the pump (don’t
forget the gasket) slide the arm down the steel rule until it is low enough to
catch the pushrod and then pull out the rule.
Then you fool around with the mounting bolts and gasket to line up the
holes and get the bolts started. Then alternately
tighten one side and another to bring
the pump to it permanent position.
Tight but not too tight (about 15-20 lb ft)
That is the ending point for
today.
More to come..
Rick Draganowski
(how can hard work be so much fun??)
Subject: Flat Cam Project day 12
Date: Saturday, September 11, 1999 9:07 PM
Today I dug right in on getting the
timing cover back on. All things
considered it was an experience I would never want to go through again. Think of grovelling on your stomach on the
radiator cross bar of your Nova and messing around at arm’s length with a demon
posessed metal cover complete with lovely gooey black RTV trimming getting on
everything and not being able to see what you are doing since your neck is too
stiff to allow you to look directly forward at the target zone.
I finally (with the help of a wooden
pusher stick) got it to the point where I could put two of the cover bolts in
(one on each side) then with the curved end of another tool and a little
screwdriver I convinced the rubber seal to get in where it belonged. Adding more black RTV for trimming all around
and slowly putting the cover bolts in one at a time (finger tight) I slowly
started bringing the cover to its final position (using just the socket to turn
the bolts and checking with an inspection mirror to be sure things were not
squishing out)..
Then using the rachet and extension the
job started to become more fun..
It was in and the bolts tightened! (
not too much as they are little guys)
So relieved by the progress (and the
fact that I could still stand up straight) I stupidly took Rustpuppy down from
the carjacks forgetting all about the 4 pan bolts which need to be
installed.. Duhhh..
After taking a break and losing the
light I jacked the front of Rustpuppy up enough to get to the pan bolts without
killing myself and rassled them back in (holding the little flashlight in my
mouth like a common thief, and drooling a lot)
The pan bolts were in! (I had pulled just the front four to pry the
pan down just a tiny bit..)
I put the tools up and called it a
day.. My neck is gonna kill me but it
was worth it and suprisingly fun for such a miserable job. (having the motor out on a stand is the only
way to go...)
Tomorrow I finish putting the rockers
and pushrods on and then after setting the valves carefully (thinking about Ray
Buck while I do it) I will be ready to hurt myself holding the 45 pound iron
intake manifold at arm’s length and getting it to come down in the right
place.. (gonna use the rubber end
gaskets again since the gap on this motor is perfect for them)
If things go well ol’ Rustpuppy will be
turning quarters in the 15’s before Thursday night...
The Edelbrock lifters use the paper
clip retainers and I am gonna set the preload at ¾ turn. I don’t know what Edelbrock recommends so
correct me if I am messing up..
Rick Draganowski
(fun fun fun)
Subject: Flat Cam Project day 13
Date: Sunday, September 12, 1999 7:23 PM
Got off to a late foggy and cold start
today. Our Oregon costal fog showed up
last night and the temp never got much above 50.
Anyway I dug in and mounted the
vibration damper using the 1” longer bolt and stack of washers trick. Worked like a charm. Then I started back on
putting on the rockers and puttin in the pushrods (making sure to get the parts
back where they came from). I got one
more cylinder done (number 5) and realized that having Rustpuppy off the
jackstands was putting the strains on me that messed me up last weekend so I
could hardly walk. Dropping the rocker
job I then put Rustpuppy back up on the jackstands..
Then back to the rockers and
pushrods. Finally all were done and I
took a break by turning my attention to the water pump which I was going to
use. From a comfortable sitting
position I inserted the 4 studs (using the double nut trick) which hold the fan
and the plug for the heater hose fitting which is not needed. (BTW Ray I used the black RTV for sealer on
the brass pipe plug) By now I had lost
the light and it was cold, damp and miserable so I called it a day and will
adjust the valves tomorrow (hope the sun shines)..
I read on the Crane Cams site that the
lifter preload on the paper clip retainer hydraulic lifters should be ½ to 1
turn. Chuck Butcher would bet that
Edelbrock recommends ½ turn. This motor
will never see the high side of 5000rpm so I am thinking ¾ turn yet. Any other opinions..
Going once...
Rick Draganowski
(cold, damp, but still having fun..)
Subject: Flat Cam Project day 14
Date: Monday, September 13, 1999 10:18 PM
Another late cold and foggy start
today. I just adjusted the valves very
carefully to ½ turn preload on the Edelbrock hydraulic lifters. I went through the whole procedure using the
¼ turn on the crankshaft and follow the firing order method Rob posted. Then went back throught it all over again
from the start, then went back and verified that none of the lifters were
bottomed and that the clearance between the piston and the clip eyeballed OK
when the lifters were on the base circle.
(It should work..)
Adjusted twice, checked twice and will
verify one more time before I put the manifold on. Slow but sure does it..
By then it was dark and cold and I had
a ton of Nova E-Mail to attend to..
More to come..
Rick Draganowski
(lifters? rockers? pushrods? when I
close my eyes I see them...)
Subject: Forces of Light, Forces of Darkness II
Date: Tuesday, September 14, 1999 9:16 PM
Another issue has presented itself and
I am again torn between those old familiar manifestations.
The issue presented itself today as I
prepared to replace the old iron Q-Jet intake manifold on Rustpuppy. After hefting the manifold (it seems heavier
than the last time I did this two years ago)
and checking the required reach I came to the conclusion that it would
be much easier with Rustpuppy down off the jackstands and on her own feet
(tires).
So I took Rustpuppy off the stands and
sat down to prepare things for the manifold replacement.
Then while sitting and wire brushing
the manifold bolts (it helps to hold the bolts in a Vicegrips to protect your
fingers) I considered the installation carefully. Then I practiced holding the manifold at arms length and slowly
lowering it like will be required when I am bending over the fender later. The damn manifold seemed heavier (I know it
is not) than the last time so I got out the scale and weighted it. It is still exactly 42 lbs with the water
neck.. I found that I could not do the
manifold lift and lower trick controllably enough to be able to get it exactly
right the first time I set it down.
Since I have no help this puts me in a serious jamb..
After sitting and thinking for a while
while I finished the wire brushing I came up with two options and at this point
the stage was set for the entry of the two tiny apparitions.
Option 1) First thing tomorrow clear away enough stuff and junk in the shop
to dig out the cherry picker hoist and get it out to Rustpuppy. A simple little chain sling and I would have
a controllable and easy way to lower the manifold into place.. The little angelic figure on my right
shoulder was enthusiastically promoting this option.
But,
there is another way...
Option 2) The Edelbrock Performer manifold is all cleaned up and waiting to
be installed on the 400 when that project gets going well. So it could be plopped on Rustpuppy easy as
pie. It only weighs 14 lbs and can
easily be held out at arms length with one hand.. The 400 deserves a brand new Edelbrock Performer RPM manifold
anyway and who knows what tomorrow may bring.
It is quick, easy and would match the Edelbrock cam now in Rustpuppy
better than the clunky old cast iron job..
The little devilish figure on my left shoulder was making a lot of
sense..
So then the tiny angel countered with
“The Edelbrock Performer RPM” is 150 bucks you don’t have and the Jeg’s catalog
don’t even mention the 400 motor for the RPM spreadbore and just lists SB Chevy
262-350. And the iron manifold is
cleaned and painted and ready to go..
It is the right thing to do...”
The tiny devil countered with “The
antique Performer manifold doesn’t even look like the new ones and is probably
obsolete. It has the clunky old 90
degree turns instead of the graceful curves of the new Performer. And it is pitted and corroded on the gasket
sealing surfaces from sitting on the 400 motor in the truck for 10 years and
probably will leak coolant into your rebuilt 400 motor and destroy it.. And it has a nasty snarf on it from the
casting flash cutting tool from when it was made... It’s a piece of junk compared to a new one. Use it! Use it! And look at the work you will save by not cleaning up to get the
cherry picker out! And just think of
how you will feel when the Nova list finds out you used a 2 ton crane to put a
42 lb intake manifold into your Nova..
You big sissy girlyman..”
The angelic figure shook his head and
disappeared. The devilish one laughed
and vanished leaving a tiny bad smell...
So there I am tonight. No real work done on Rustpuppy and balanced
between the Forces of Darkness and Light..
(and I am leaning pretty heavily as you can see from the arguments
above..)
Oh well, I will sleep on it..
More to come..
Rick Draganowski
Subject: Flat Cam Project day 15 (spread over 3 days)
Date: Friday, September 17, 1999 8:17 PM
As the list knows I am going to put the
used antique Edelbrock Performer manifold on Rustpuppy (I can do it by myself!)
and so the last three days (an hour or so a day) were spent on getting the
Performer up to standard.
On the first day I puttied it up with
JB Weld to fix the serious pitting problem it had. I mistakenly trowelled the epoxy flush with the surface not
realizing that it shrinks quite a lot when it hardens as well as adsorbs into
the rough surface of the pits. So
yesterday when I sanded it down I found that there still would be depressions
in the gasket surfaces in critical places.
A day wasted as I should have left the epoxy proud and ground it down
flush after hardening. So another layer
went on and the manifold spent another night under the heat lamp. (for best results keep the temp above 60
degrees when hardening epoxy)
Today I ground the JB Weld epoxy down
flush and it made a durable permanent repair to the manifold. Excellent stuff!
Then I salvaged the pipe plug from the
old cast manifold and together with a new one I (using black RTV as a sealer)
inserted them into the Edelbrock. One
of them never got tight and I am a tiny bit concerned that the taper thread was
cut a little oversize by ol’ Vic. But the
RTV should hold back the flood..
Next I salvaged the neato Mr.Gasket
O-ring style chrome water neck from the cast iron manifold. The neck had only been on Rustpuppy for a
little less than 2 years so I assumed that it would be in good shape. Rustpuppy had fresh antifreeze (30% mix) for
that period so there should not be a corrosion problem. Right? Wrong!
This is Oregon and Oregon coastal rain
water (our spring’s source) is a
powerful force. The neck had obscene
white and grey deposits hanging in it and was almost eaten through. Only the chrome plating was left at one
point. Bummer! And I have a brand new one still in the
bubble pack in the “Parts for the 400” box..
I also have a genuine cast iron water
neck (marine part) in reserve so that lovely thing with a 180 degree known good
used thermostat was plopped on with a new gasket with black RTV on both sides
and the manifold was ready to install.
Tomorrow.. For sure..
But..
I have a serious project scheduled for
tomorrow so the Flat Cam Project may slip to Sunday.. We will see..
More to come..
Rick Draganowski
(Note: Upon close inspection and
comparision the runners in the Edelbrock are about 30% larger than the
stocker.. Not bad..)
Subject: Ports and foggy rain..
Date: Sunday, September 19, 1999 7:59 PM
My “best laid plans” went aft agley as
the weather turned against me today.
Yesterday (a beautiful sunny day) was lost due to an “Important Project”
which is only half done and returns to haunt me tomorrow. Today was the day to get Ol’ Rustpuppy goin
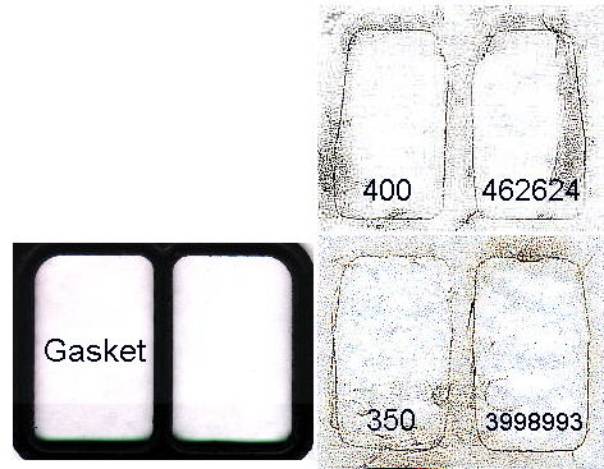
again and foggy rain and 56 degrees is what I get instead.. So I amused myself with the port project..
Port project is tracings of the 350
heads and the 400 heads to capture the intake port outlines. Got them and the gasket in the picture
below. The casting numbers are on the pic
as well as the location of the heads now..
I was disappointed in the look of the
ports on the 400 motor as they have those screwy slanted in sides at the top
and the big blivot in the septum.. Scot
Windle said some months back “Those are good heads.” but they don’t look so hot
to me.. What does everyone think??
The 350 heads almost fit the gasket and
the Performer manifold does even better..
Hmmmm..
More to come as I do some more indoor
jobs..
Rick Draganowski
(cold, damp and wondering about those heads..)
Subject: Distributor and Foggy Rain
Date: Sunday, September 19, 1999 9:29 PM
Part two of my indoor Nova work was on
the old HEI that originally came on my junked 77 pickup.. (170,000 miles on it
and it is still happy) The vacuum
advance is a 15 degree truck job with a heavy spring and I cut up a bit of
vacuum hose to limit it to only 10 degrees total.
(I am saving the fancy Polished Proform
with the neato Accel adjustable vacuum advance and the see through cap for the
400)
Then I pulled the stock heavy springs
off the centrifugal advance and replaced them with the middle springs out of a
Moroso HEI Advance Curve Kit (the silver jobs). I left the heavy stock weights on and did not limit the
centrifugal advance (it is only about 22 crank degrees so I should be OK).
Testing will tell and with a good cam
Rustpuppys motor will be happy and not need a lot of initial advance (more like
a real small block). I figure about 12
static (34 total) and 10 degrees of vacuum advance should do it right..
Time will tell..
More to come..
Rick Draganowski
(still gonna use 92 octane in the 8.5
motor though. Performer cam still too
small for low octane piss gas..)
Subject: Flat Cam Project day 16
Date: Thursday, September 23, 1999 6:34 PM
The weather was clear and sunny and
about 65 today and the “Really Important Project” was safely finished yesterday
so I could dig back in to Rustpuppy and the Flat Cam Project.. (I figured I had about 3 hours clear shot during
the nicest part of the day (4pm to 7pm))
First things first. I had adjusted the valves in the foggy
darkness so the cleaned up and repaired Edelbrock Performer mounting was
next. I had used the stock rubber front
and rear gaskets twice with sucess on the original cast iron Q-Jet manifold but
when using an aftermarket manifold it is best to err on the side of caution so
I used the 3/16 bead of RTV and pitched the rubber gaskets.
The manifold gaskets were the mid
priced Victor Reinz sold by NAPA and the manifold went on with no drama. Since I left the big oil pressure sender on
it took a little manuvering around to get it exact before dropping it but all
went well since the 14 lb aluminum manifold is fun to install compared to the
42 lb cast iron boatanchor..
I admit that I did not use the torque
wrench on the manifold bolts but I trust myself to get it within 3 or 4 ft lbs.
(Don’t try that at home kids..) I did follow the sequence though (you must
follow the sequence and sneak up on the final torque all around a little at a
time!)
Next was the crankshaft pully. Thinkin about Aren’s knock I slapped it on
and got the bolts tight. I verified
that the 350 was at TDC on number one firing stroke. (turned it forward enough to see the number 6 intake open a
little and then went back.. (right
Rob?)) That will make getting the
distributor back in easier and a little more fun.. (that is what this stuff is all about)
That finished I put the cleaned up an
painted water pump on. Remember the
sealer on the lower driver’s side bolt.
I found that with a gennie GM water pump the home made power steering
pump spacer (stack o washers) did not fit as the GM casting is beefier than the
cheapo aftermarket part. I scratched
around a little and found the right part still hanging on the front of the 400
motor (which came with a power steering pump).
So that hurdle was crossed.
Then I dragged out both Rustpuppies
Q-Jet and the 400 Q-Jet to swap some parts back to allow Rustpuppy to get her
own carb back. (The P.O. had looted the
400 carb for bits to use on the Edelbrock carb he would up with and I had
swapped the 400 Q-Jet onto Rustpuppy during the diagnosis process.)
That accomplished I put the correct
Q-Jet on the manifold in Rustpuppy and rummaged around getting stuff hooked
up.. I found that the choke stove screw
used on the cast iron manifold was useless as the Edelbrock manifold uses what
appears to be an 8-32 machine screw instead of a self tapping metal screw.. The carb is on but not tightened down yet. Gotta check and re-check and want full light
for the next few steps..
Oh well.. 7:00 pm was reached and darkness and dampness was falling so I
called it a day to come in to write the day’s progress up for the list..
More to come...
Rick Draganowski
(Fun Day!!)
Subject: Flat Cam Project day 17
Date: Friday, September 24, 1999 6:34 PM
Got an early start and perfect weather
to get after ol’ Rustpuppy today.
When I first woke up this morning I had
a twinge (sorta the feeling that Rob Roberson knew I was cuttin corners and was
makin jokes about my poor workmanship to the rest of the list) so I had to
revisit the manifold installation I did yesterday.
I had left out the washers and
neglected to put RTV on the center 4 bolts so it looked a little funny and I
knew that oil would migrate up from the lifter valley and make those familiar old
oil puddles at the base of the carb. So
one by one I pulled the bolts put on a modified (ground on one side to clear
the casting) washer and a smear of RTV and put them back. (Rob would be happy)
Then I realized when I was checking the
manifold bolt torque for all of them that ol Idjit me had forgotten to put the
transmission kickdown bracket under the last two bolts on the drivers
side. Got that done and moved on
smartly to new ground.
Got the stock (180k miles) Q-Jet put on
with a ¼ inch thick fiber heat insulating gasket with the neat plastic inserts
to keep from distorting the base flange (this carb has always had one). Didn’t
torque it down yet..
When it was off I checked the old carb
primary throttle shaft for play (at the end the throttle cable crank is on) and
was impressed with how little wear there was.
This is a hi-milage carb but it was used for about 90% highway driving
(not much movement on throttle) and the other 10% was mostly at full throttle. (I know since I put 140K of those miles on
it myself)
Then I threaded the kickdown cable
through the bracket and it snapped into place harpooning the pushrod of number
5 exhaust valve. Had to run and get the
channel locks to release it to get it out of the Chinese puzzle it got itself
into. Reinstalling it proper and
progress was being made.
Then I realized that to get the
kickdown cable hooked to the throttle linkage I had to back the carb mounting
bolts out of the threads to slide the carb back enough. I seemed to be losing almost as much ground
as I was takin..
With the cables on I got the carb into
position and the bolts tightened. (When
puttin the bolts in a Q-Jet on an aluminum manifold be careful not to
overtighten them, I choke up on the socket wrench so the effective length of
the wrench is only about 2 or 3 inches to be extra careful, some rodders use carb mounting studs to
protect the manifold threads..) With
the fiber spacer you gotta retorque the carb after a couple of days as it
settles in..
Then I started on the divorced choke
stove installation. A trial fitting
showed that the Edelbrock Performer manifold puts the choke stove higher and
closer to the carb than the stock manifold.
(I was almost startin to doubt the wisdom of listening to the little
horned guy on my left shoulder about using the Edelbrock) But with the help of an extra bit of linkage
that came with the 400 carb I bent it up good and modified the stove cover just
a little and got that detail worked out.
(not just a drop on thingie though)
Then it was time to get the steel stock
fuel line from the fuel pump to the carb on..
Another hitch. On the Edelbrock
the carb sits about ¾” higher than on the stock cast iron manifold so I had to
carefully bend the tubing (by hand) and lucked into a perfect fit.. (and makin a mental note to check the air
cleaner mounting stud to hood clearance..
Hmmm)
With the carb and fuel all hooked up I
then got the modulator vacuum line to the tranny on and most of the topside
work was done..
Next I muscled the power steering pump into
position and got the mounting bolts in just snug (tighten them when I put the
belt on) I checked the pully alignment
and it was perfect (you sight down the rear surface plane of the pump pully and
verify it is in the exact same plane as the crank pully..
Then I did a little cosmetic rework of
the ol’ stock valve covers. I
painstakingly scraped off all the RTV I had the gaskets glued in with (thinkin
about Ray Buck and swearing that I ain’t gonna do that no more (what solvent
eats RTV?)) I am gonna use the steel
core rubber valve cover gaskets with no glue from now on..
After cleaning the grease and rust off
the outside and wiping out the inside I set the valve covers on a cardboard box
and gave them a nice runny coat of fish eyed Oldsmobile Motor Blue paint.. (not too picky on ol Rustpuppy cosmetics)
At this point it was about six and I was dizzy from the paint fumes and
decided to call it a day and come in to tend to the Nova list E-mail..
And that is that..
More to come..
Rick Draganowski
(still got a bit of a headache from the damn
paint..)
Subject: Flat Cam Project day 18
Date: Saturday, September 25, 1999 6:38 PM
Today was another beautiful fall day
with just a hint of chill in the sea breeze and the sun shining..
I was delayed due to some necessary
chores but managed to get after Rustpuppy at about 5 or so and expected to have
at least 2 hours..
The first order of business was getting
the cosmetically enhanced rocker covers back on. I used the black rubber gaskets with the steel core. I got them from Jeg’s but cannot remember
who made them. (got them over a year
ago). They are neat but thicker than
ordinary gaskets. Between the extra
thick gaskets and the long armed hold down thingies I struggled for some time
getting the little bit too short rocker cover bolts in. Eventually they were in and I tightened them
until the hold downs were bent down and touching the rocker in the center and
then a tiny bit more. (is that what the
manufacturer intended? I never have seen directions on these thingies..)
The sorry old truck motor in Rustpuppy
was startin to look almost purdy..
I figured I had time tonight to get the
distrubutor in and the spark plug wires on and that would be it.
When I started this project I made damn
sure the motor was exactly on TDC number one firing stroke before I pulled the
distributor. I had replaced it at TDC
no.1 when I finished adjusting the valves so puttin the distributor in should
be a piece of cake.
Making sure the hold down was pulled
back and the gasket was it place I dropped the distributor in, set the rotor to
where it went to when I pulled the distributor (remembered that no marks
needed) and dropped the puppy in.
Guess what? It went in fine with no drama.. (experience is good)
Then I put the distributor cap/spark
plug wire assembly on plugged every thing in (connector from distributor to
cap, HEI pink primary wire, and tach wire) and routed and snapped on the spark
plug wires (I have them tyrapped in a harness assy and marked clearly)
Tomorrow I fasten up the spark plug
wires to keep them off the headers, mount and hook up the alternator etc..
Tomorrow looks like “The Day”...
More to come..
Rick Draganowski
(Having more fun than should be legal....:-)
Subject: Flat Cam Project day 19
Date: Sunday, September 26, 1999 6:42 PM
“The best laid plans o mice and men,
gang aft agley.” Today which was going
to be “The Day” to get Rustpuppy going again is not.
People (dear friends) who helped me
with “The Very Important Project” which has delayed the Flat Cam Project so
much showed up about 30 minutes into todays scheduled 2 hour work period. Due to important social obligations about
one hour disappeared never to be seen again..
Sooo...
This is what was done..
First I got the spark plug wires
tyrapped up and off the headers. With
quality silicone spark plug wires and a stock HEI no big precautions have to be
taking so I could just bundle them up any old way..
With the hotter modern aftermarket
ignitions and high compression motors it is best to avoid running the wiring
bunched up and a proper harness is the way to go.. But not on Rustpuppy with her 8.2 to 1 motor and her 180k mile
HEI (almost all original)..
Then I got the fan and fan pully
on. The paint on the water pump shaft
made it not want to seat so I convinced it to go on by drawing on the 4
mounting nuts a little at a time all around.
Then the belts (shorter one first for
the power steering pump and then the alternator) and adjusted the tension and
tightened everything down. (I set the
belt tension so that a 10 lb force deflects the belt about ¾ inch, you don’t
want them really tight as the bearings in the alternator, water pump, and power
steering pump have their lives shortened.
It is much cheaper to adjust and replace belts every couple of years..)
Then the alternator wiring, vacuum
advance line, fasten the water temp wire to keep it off the headers, and I was
ready to drop in the radiator..
With the radiator sitting in place
(stock 2 row from the six) and before putting the fan shroud on I got the
transmission cooling lines on. (never cross thread these, you will regret
it, finger tight for at least 1 ½ turns
first) It is easier if you can spin the wrench all the way around.. I use only tubing wrenches on any tubing
fitting and have for years. (The result
of some bitter experiences in my youth.)
They are a good investment and every one who works on motors should have
a set.
Then the fan shroud and top radiator
bracket (on Rustpuppy it is a pop riveted assembly) went on and at this point
darkness fell and the job was left unfinished again..
So close..
All that is left is..
1)radiator hoses
2)hood latch bracket
3)grille
2)coolant (water for now)
3)air cleaner
4)hook battery back up
5)jack Rustpuppy up and change the oil and filter..
6)start her up!!
I would have made it easy..
Oh well...
Tomorrow is another day..
More to come..
Rick Draganowski
(good friends is good)
Subject: Flat Cam Project day 20 (Rustpuppy lives!)
Date: Monday, September 27, 1999 6:44 PM
Due to press of business (have you ever
noticed how inconvenient work makes life?) a very late Monday start (6:30 to
7:00 pm window)
I decided to just do enough to light
Rustpuppy off and hear the wonderful 2
½” Dynomax Super Turbo’s as soon as possible.
So I just slammed on the radiator
hoses, hood latch bracket (in case I drive) and pour in about 2 ½ gallons of
water listening to the interesting gurgling and bubbling.
I decided to let the oil and filter
change and the grille wait till tomorrow..
Then I put the battery ground cable
back on (ALWAYS remove it when tearing into your motor).
Opening Rustpuppy’s driver door I
noticed that the spiders had built webs all over where I sit.. I cleaned them away and slid in..
Then the moment of truth came and I
cranked Rustpuppy enought to fill the Q-Jet with gas and....
She fired right up and settled into a
fast idle.. The gas pedal felt funny
so I switched off and checked under the hood.
The ol’ idiot had forgotten in his excitement to put the carb throttle
return springs back on..
Darkness was falling as I fumbled them
back on (hooks in on inner spring and out on outer spring)..
Then back into the drivers seat and
fired her up again. The timing had not
been set but the instant throttle response was fantastic. The slow decay of the original cam had made
me used to a really crappy response..
It was really worth the time and effort
expended. I probably will be tearing
up the road tomorrow after the oil change, checking for coolant leaks (thinking
about Chuck Butcher), setting the timing, adjusting the idle, and replacing the
grille..
And then it is time for the G-Tech Pro
to come out of the glovebox..
More to come...
Rick Draganowski
(red letter day for a happy ol fart..)
Subject: Flat Cam Project day 21 (last day)
Date: Tuesday, September 28, 1999 7:24 PM
Today was a scorcher for us here on the
Oregon coast. The sun was shining and
the temperature was 78 (wow!) so I was sweating (for a change and enjoying it)
during today’s tasks. (normally is in the mid 60’s)
The first order of business was to get
the old cam scraping filled oil out.. So I jacked ol Rustpuppy up and put a
jackstand under the frame (I aint gettin under no car on a bumper jack). The oil was out in a bucket and the filter
off in a trice. (I invested in one of those neat oil filter wrenches which fits
on the end of the filter and has a square hole for a 3/8 drive extension)
I am gonna open up this oil filter to
examine what is trapped in it.. (sort
of an autopsy test) Then the plug back
in (I once put 12 quarts of oil in a Jaguar XK120 with the plug out in my Dad’s
garage (with a new concrete floor) he thought that it was careless of me)
The oil back in, took 4 quarts, started
it up to get pressure, and then the fifth..
Drove Rustpuppy for the first time in a
long time next. Stayed off the throttle
until the temp was up to normal and then stepped on it a little.
The results were fantastic! Even with the timing not set it don’t feel
or sound like ol’ Rustpuppy no more!
Since the idle was not set the first time I stopped the motor died and I
had too much advance cranked in for it to crank when hot. (cleverly I had left the distributor just
loose enough to turn by hand but stay where you put it) so I hopped out and
retarded the spark about 15 degrees..
Rustpuppy started right up and I headed
back down the hill to home..
Dug out my Equus Pro dial back timing
light ($69.95 and worth every penny) and messed about with the timing for a
while. With the soft springs in the
centrifugal advance it is all in by about 2500 rpm.. The vacuum advance is limited to 12 degrees by the rubber stop I
put in it.
So when I set the total advance at 35
degrees (with the vacuum advance disabled) I was still stuck with 13 degrees
initial because the truck distributor only has 22 degrees of centrifugal. With all the cylinders working (well mostly,
number 5 is a little sick) Rustpuppy is still a bear to start when hot now.
Hmmm..
I probably have to cut back to 30 degrees total until I mess with the
ol’ stock distributor again. That
should give me 8 degrees initial and the motor should crank and start hot ok..
In any case I then adjusted the idle
stop screw (lopes a little at about 700 rpm) and after putting the air cleaner
on (and it don’t fit right because the Edelbrock is taller and the pipe going
to the valve cover is too short now) was ready for another run on the road.
Remember the cute little whistle the
Q-Jet made on Rustpuppy at about 2000 rpm?
It is still there but sounds more like a manifold vacuum Wolf Whistle
(remember them?).
This motor sounds serious. The sound from the 2 ½” exhaust and Dynomax
Super Turbo’s is different. Also the
bog off idle Rustpuppy had is gone completely.
When you step on the gas, it goes!
On the difference in sound the best
simile I could think of is this.
Pretend that before it was making a sound like a delicate Jersy cow
going “moo..” Now it sounds like a
1200lb bull going “MOOOO!!!” just before a fight with another bull. More agressive...
The two things which struck me was the
amount of front end lift when stepping on it from a standing start (or when
going for that matter) and the smoothness which the transmission was
shifting. I almost thought that there
was something wrong with it until I realized that the tires were spinning
(these radials on the weathered asphalt just make a shooshing sound which the
“bull call” covers up.. The getting
pushed back in the seat when stepping on the gas is good too...
:-)
It makes you smile..
Mebby tomorrow I will run the
G-tech. I am almost willing to bet
money that Rustpuppy will go from a dismal 16.4 to at least the low 15’s
judging by the rush....
I have not got the grille in yet but
that can wait...
The “Flat Cam Project” is officially
over..
The “Rustpuppy Log” will be
starting..
Rick Draganowski
(really happy ol’ fart)
Subject: Rustpuppy Log day 1
Date: Wednesday, September 29, 1999 7:41 PM
Today was another scorcher 80 degrees
here and sunny. (Indian summer with a
vengeance, soon it will be 45 and raining)..
Still with some doubts about the smooth
shifting of the TH350 (with a shift kit) in the newly invigorated Rustpuppy I
checked the fluid and found it only about a pint low. Not enough to make a difference.
I expect the smooth 1-2 shift is because the right rear tire spins and
takes up the thump, and the 2-3 shift is smoother because the extra torque of
the motor is allowing the 2-3 clutch to slip just a little. The rpm changes quickly, the big thump is
just missing..
I replaced the grille on Rustpuppy
(finding out too late that you can get it on upside down. I found out when I
tried to put in the two center hex screws)
Oh well it was off and back on in just a minute. The Junkyard Dawg don’t even got no grille
so I will be in the market for a 75 LN grille next year, any aftermarket parts
available??
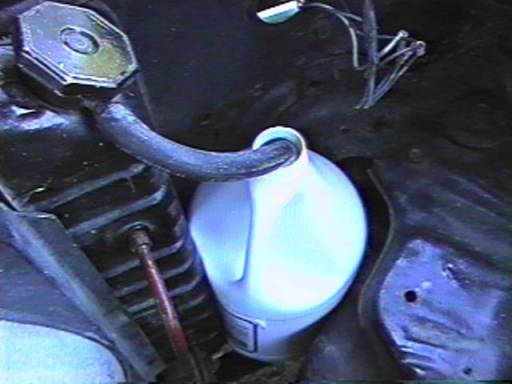
Then I invented a new improved coolant
recovery tank. The stock job which fits
nicely in the right front fender has a crack and cannot hold coolant so I have
been running Rustpuppy with a bit of air in the radiator for some years
now. That causes extra corrosion and a
coolant recovery system is really good for your motor.
Soo.
I took an old plastic gallon jug (laundry detergent came in it) and
jammed it down in that perfect little nook nestled between the right side of
the radiator and the frame. On a Disco
Nova with the battery in the trunk it makes a perfect location for a coolant
recovery tank. Left the cap off and
stuck the overflow hose down in to within an inch of the bottom it and filled
it half full of water..
Then as the shadows grew longer and the
sun started to set it was time to get out on the road with Rustpuppy and the
G-Tech Pro mobile dragstrip..
I was gonna just get the feel of the
extra power on the old country road and do a 0-60 time. The first time I tried nothing happened
except a lot of noise and smoke from the right rear tire. I realized that you must feather foot it off
the line with the open 3.08 axle rustpuppy has (and the hard compound highway
type 215R70-14 tires)
Another few tries came up with a best
of 6.4 seconds. Before the best
Rustpuppy has ever done was 8 seconds flat..
We are getting somewhere!
Supressing my excitement and doing my
Yogic breath exercises I cruised Rustpuppy south a couple more miles to the
place on Highway 101 that I use for the quarter times..
They had recently repaved the spot and
enough time had passed to wash away the oil yet leave the relatively sharp
gravel points showing. Looked like a
nice fast track..
Then It was several breaths and “Go
like hell..” down the highway. I could
see the blinking 0-60 time out of the corner of my eye and it was 6.64 (slower
than my best by .24) but I had feathered it a little too much on the start. (had an old section of pavement to launch
from and had not much bite)
Then the 1-2 shift came up and hit me
in the back like a defensive tackle from the NFL since I was on the biting part
of the highway and there was just a loud short chUUrrp from the much suffering
right rear tire.
The amazingly soft 2-3 shift came up
quickly as the tranny is set to shift at full throttle at 4400 rpm. (higher would be better)
Then the blinking for the quarter
started and I got off quick and coasted back down to about 60. I could see the G-Tech blinking the results
but I forced myself to relax and watch the road until I could turn off on to
the old highway and stop.
The very best that Rustpuppy had done
before (when I first got the G-Tech and before the Goodwrench en Mexico cam
rotted out) was 16.4 @ 87..
Today it was...
15.16 @ 94.2...
Happy, Happy, Joy, Joy..
Rustpuppy is runnin good and I haven’t
even started tuning yet..
But,
There was just a tiny tad of misfiring
just as I passed 90 mph and I wonder what could be causing it.. Could it be tired old valve springs?
More to come.. (and Aren, I am working on the “Comet From
Hell” report)
Rick Draganowski
(lookin for high 14’s)
Subject: Rustpuppy Log day 2
Date: Thursday, September 30, 1999 5:17 PM
Not a lot today but I ran Rustpuppy’s
weight (race ready with driver is 3900) and quarter MPH (94.2) through the
equation which is supposed to guess your horsepower (wonder how accurate those
jibbies are?) and came up with about
280 horsepower. I was impressed since
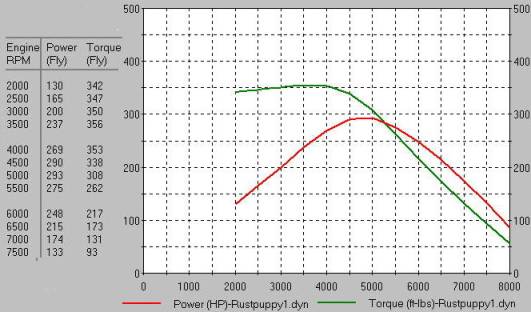
Rustpuppy’s motor is an old junker and really needs a rebuild. I cranked the motor specs through Dyno2000
and came up with the attached chart.
Not bad at all.
Some bad news marred my triumph
yesterday as I heard from Chuck Butcher in Baker City (about 500 miles away
from here) that the Junkyard Dawg
(nestled safely in the far corner of the junkyard) is gonna have to be moved
right away. He has found a place to
store it but it’s gonna cost me 25 bucks a month so the pressure to figger out
a reasonable way to get the motorless
Dawg across the whole diagonal length of the state of Oregon is really on...
And my finances are stretched to the
limit already... Oh well... It will all
work out...
Kwitcher whinin...
I tested Rustpuppy yesterday evening
and she still has the hot starting problem from the 13 degrees initial advance
so I am gonna set the timing back 3 degrees and see if that will cure it. 35 degrees total now and going back to 32..
I wonder how much the quarter times
will change? We will see..
More to come..
BTW Aren I have been working on the
“Comet From Hell” story each day for as long as I can stand to... It is gonna take several more days..
Rick Draganowski
(15.16 @ 94.2 with a total of 1600
bucks invested(750 for the car and 850 for the odds and ends, happy, happy :-)
Subject: Rustpuppy Log day 3
Date: Saturday, October 02, 1999 8:20 PM
Went to town yesterday in
Rustpuppy. Beautiful day, sunny and
about 70. Kept my foot out of it to
avoid unpleasant complications so it was just a senic drive and a chance to
fill Rustpuppy up with some 92 octane (had to put in some gasoline from the
mower can to get to town). Ran like a
clock and started fine at the 7.5 degree static advance..
Today was sunny at first but the temp
had dropped and the cold fog was in by this afternoon. Like a Werewolf of London picture it was
thick and the temp was down to 50..
Real Oregon coast weather..
The first thing I noticed when I
checked Rustpuppy for starting was that the choke was not working
correctly. No fast idle and dies
without some gas..
Oh well, the modification to the choke pushrod was just a guess. I messed around with the choke in the fog
for a while and was able to torture the linkage to get the correct length (see
picture, it was straight to start with, the little screw was just there to prop
it up so you could see the bend properly).
That out of the way I got back on the
road to see if the choke was allowing the secondaries to open when the motor
warmed up a little. It almost seemed
not to be as Rustpuppy seemed to be on Prozac or sumptin. The roar and tire spinning insanity was much
reduced (and sorely missed)..
Back at the tree (shade tree in front
of my shop where all the Rustpuppy work takes place) I found that the
secondaries were indeed opening and the choke was fully off.. Hmmmm...
I cranked the distributor over (in the
advance direction) about the amount I retarded it to get Rustpuppy to start
nice when hot. Then back on the road in
the dense fog (only about 50 feet visibility so no racing allowed)
But,
the big roar and insane tire spinning was back with a vengeance as
Rustpuppy loves the right timing combined with 50 degrees with 100% humidity
air. More power!
So back at the tree I checked where the
static timing was after the tweak.. It
was right back at 13 degrees to put the total advance back up to 35 degrees.
Cutting it back to 29.5 degrees total advance took all of the Moxie out of ol’
Rustpuppy so I gotta figger another way of beating the hot start problem..
I crawled around by the starter to see
what could be done to provide a thermal barrier between the headers and the
starter and it is really snug in there.
A header tube runs almost the whole length of the starter about ¼” away
and another one is almost touching the solenoid.. It must be gettin hotter that the hubs of hell in there.
Hmmm, forced air ventilation through
the hole left by the absent heater.. Stick
cement siding and aluminum sheet sandwich between the headers and the
starter... Modified windshield washer
to spray cold water on the starter..
Ideas, ideas....
More to come..
Rick Draganowski
(I could just sit and wait for
Rustpuppy to cool off every time I stop the motor :-)
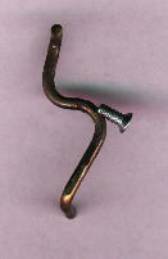
Subject: Rustpuppy Log day 4
Date: Monday, October 04, 1999 5:37 PM
I noticed last night that the dome
light got really dim when I was messing about with the hot start problem. I had been getting the alt light on dimly
for about 6 months and theorized that the battery was going a little low so I
put it on the charger last night.
Since a flat battery is only one way to
get the low voltage at startup I went through and checked the connections on my
homemade trunk installation. Aha! the
hot cable was a little loose and could easily have caused the problem.
I fixed that and piled into Rustpuppy
for another hot soak road test. I
notice that the choke was not going fully off within the first half mile as
normal and stayed on enough to block the secondaries of the Q-Jet for about a
mile and a half. When the choke finally
kicked off the roaring spinning madness returned. :-)
So back under the shade tree I switched
off, waited a few minutes and tried to start hot. The starter was a little slower than when the motor was cold but
spun the motor fine and it took off running without any problems. The extra resistance of the loose battery
terminal was fouling me up. Happy
solution but time will tell....
But the choke was still not right. The pushrod length is critical on the Q-Jet
and I was now about 1/8” too short instead of ¼” too long.. So I pulled it off and tormented the poor
linkage some more to get the rod effective length about 3/16” longer. Gonna have to keep testing until I can get
it exactly right. This is an important
adjustment and can cause a lot of the Q-Jet problems impatient rodders
have..
Today made the arrangements via phone
and fax to get a new home in Baker City (450 miles away) for “Junkyard Dawg” and even though it is
gonna cost me 25 bucks a month I am relieved..
There is always something. As the list knows I was lazy about keeping
the header bolts tight on Rustpuppy and they loosened up enough to have one
fall out and be lost. I have the Nitro
Seal steel and carbon composite gaskets and I thought that letting the bolts go
loose did not damage the gasket. I was
wrong and I am gettin at least one and possibly two header leak ticks. The cylinders that were not firing well (or
at all) with the flat cam must be pounding the header gaskets with their
powerful and noisy breath..
So for best results I gotta go in an
pull the headers again and put in new gaskets to quiet them down.. Oh well, I really like workin on
Rustpuppy...
I gotta go now and look for the rod cap
for Trinidad Zepeda..
More to come..
Rick Draganowski
(startin hot, for now)
Subject: Rustpuppy Log day 4 addendum
Date: Monday, October 04, 1999 7:29 PM
After finding the rod cap for Trinidad
I went back to Rustpuppy for a couple of things. I found that the socket which the left rear
taillight/brakelight/turn signal bulb plugs into had rotted away to the point
of no return. I spliced in a new socket
I had bought at NAPA in a few minutes.
I noticed the official Echlin part has the small print “Made in China”
on it. Hmmm...
In any case it is really important to
have turn signals and brakelights working right on your old Nova as even when
the other drivers know what you are
doing they are a risk. And making a
left turn without signals is a dance with death in serious traffic..
Darkness had fallen and the evening was
cool and windless and there seemed to be no traffic at all on Hwy 101 so I made
a snap decision to take Rustpuppy for another trip to the G-Tech Mobile
Dragstrip..
I got down to the new paving with the
good bite and Rustpuppy seemed to be running strong and eager.
I staged right in the middle of the
road (no traffic remember) and got one of the best starts ever. Running fast after dark on the narrowest
part of the causeway is a little challenging and my old nerves were fraying
fast but the blinking quarter signal came up quickly and I coasted back down to
a sane speed and waited again until I was pulled off the narrow highway and
stopped before reading the G-Tech.
Hot dog!
15.04 @ 97.3
Rustpuppy loves the cool humid coast
air and always ran best in the evening..
Rick Draganowski
(lookin for 14’s..
:-)
![[ Go Home Button ]](../gif/t_home.gif)
![[ Next Button ]](../gif/t_next.gif)