Subject: Return of Rustpuppy report 9
Date: Friday,
March 24, 2000 10:59 PM
Due to an
illness in the family (ol’ Draganowski got an abcessed tooth) and the
excitement of Chuck Butcher’s amazing arrival with the Junkyard Dawg I have
neglected the on-going build up of Goody.
Fear
not, some work was accomplished. (and a couple of brain fart caused disasters)
First
the disasters. The first was minor
but annoying. While putting the
last valve in on the heads I managed to drop one of the keepers. I disappeared and could not be found on
the floor. Due to the ¾” crack
between the floor planks just below my workbench I guessed that it had gone
down under my barn (about 4 feet to the dirt below). I had some ratty old keepers salvaged from one of the
scrapped 305 motors I have, so the disaster was not serious, but I really
wanted to use the shiny new ones all the way through..
I
thought of a long shot solution. I
took a 5 foot length of brake tubing and taped my magnetic pickup tool to the
end of it. Then hoping against
hope (and common sense) I fished around blindly under the barn hoping the keeper
would show up on the end of the magnet.
This nonsense went on for about 5 minutes and I hauled up the magnet
hoping to find the keeper..
No such
luck. But I am a patient and
persistent man (some would say idiotically stubborn) and I tried again. Another five minutes of random area
sweeps in the dark underside of the floor. I hauled up the magnet and the keeper was there! Happy happy, joy joy.. A small victory but I am hoping it is a
good sign. This is the first
little widget I have ever recovered from the underfloor trap in the last 20
years..
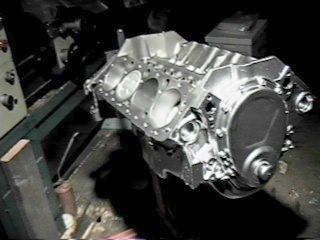
Now on
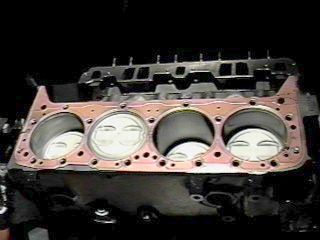
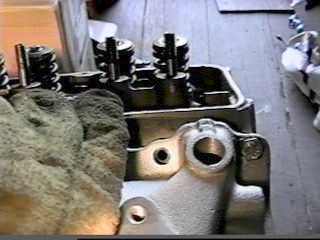
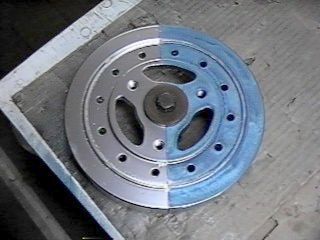
to the actual work. First I
carefully cleaned all of the old head gasket remains from the deck surface of
Goody. I used 220 grit wetordry
silicon carbide paper to polish the surface and remove any small
irregularities. The graphite
composition stock head gasket left a lot of crap on the surface but when I was
done it looked great (see ror9-1.jpg)
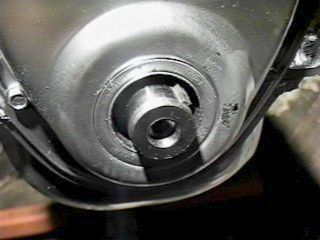
I had
planned to put on one head (the drivers side) and then check rocker
geometry. I have a crank turning
socket and when I removed the plastic cap off the end of the crank I found that
the second key (the one used to locate the vibration damper) was missing. It is always something. Nowhere in the Goodwrench Saga does CHP
mention that this part is missing on a crate motor. And the little bag of hardware that came with Goody
contained no Woodruff key.. Poop!
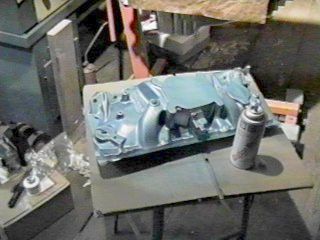
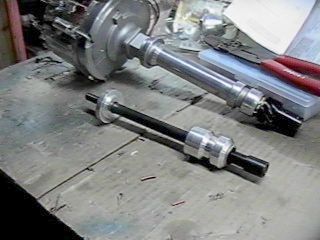
I
scrounged around for a while and located a rusty old 305 crank which had the
key. After removing it I carefully
installed it into Goody (messing up the paint on the timing cover, see
ror9-2.jpg) What a pain in the
butt.. But I am having fun..
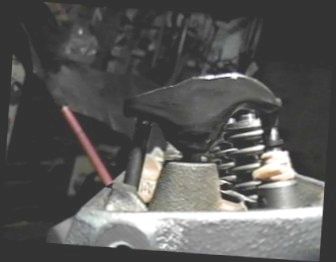
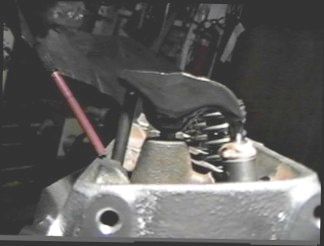
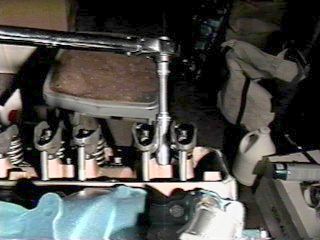
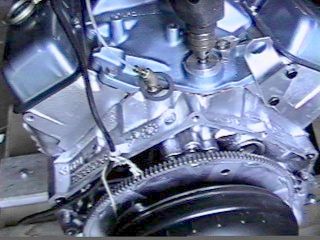
Then I
took the spring off of the number one exhaust valve and secured the valve with
a bundle of rubber bands. After
setting the head in place on the short block (on 3 layers of paper to get the
0.015 thickness of the gasket) I checked the rocker geometry. The exhaust valves have the most lift
so this was worse case. Pictures
ror9-3.jpg and ror9-4.jpg show the valve fully closed and fully open. No problems and the rocker stayed on
the center third of the valve stem and the slot is not binding. I expected no problems but it does no
harm to be sure.. Removing the
head and replacing the valve spring, retainer, and keeper took but a moment.
I have
heard from respected rodders that you should make the gaps in the keepers even
for some reason. Goody came with
them all (100%) jammed on one side with all the gap on the other.. Is this a valid concern or another
rodding urban myth?? Anyway I made
them all even..
Then I
move forward to putting on the first head. I carefully sprayed both sides of the Fel-Pro shim head gasket
with the CopperCoat and went to install it on the locating pins while the
CopperCoat was quite tacky.
Then the
Cosmic Brain Fart occured. It
seems that FelPro provides a odd shaped hole with a spring finger to accurately
locate the gasket on the pins. Not
wanting to mess up the coating I was being too delicate with the gasket and
naturally it fell to the dirty barn floor. I sat there blinking in disbelief as my first instinct (old
Space Center quality control reflexes) was to discard the now soiled (little
boogers stuck all over the tacky sealant) gasket. (25 bucks and much time just went sailing out the window)
I sat
for about a minute thinking of possible courses of action. Then I carefully (by the edges) picked
up the gasket and examined it. I
could see in the strong spotlight lots of boogers. But, if I take
my time and inspect carefully I could pick them (with an X-acto knife point)
off and give the gasket a clean bill of health..
About 20
minutes of intensive gasket-picking follows...
Then I
returned the rehabilitated gasket to it’s rightful position on the locating
pins.. (picture ror9-5.jpg shows
the gasket with the CopperCoat coating, cheating a little here as this is the
other head) The head followed and then I sat and replaced the head bolts after
coating the top third of the threads with the teflon paste sealer..
A little
time with my click type torque wrench and the head was down to stay.. My Chiltons sez 65 lbft but the senior
head builder on the internet sez 68 lbft of torque. I went through the torque sequence first at 30 lbft
then at 40 then twice at 50 then at 70 (my torque wrench is a little weak) for
3 times around.. Taking your time
here pays off..
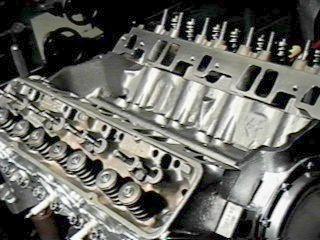
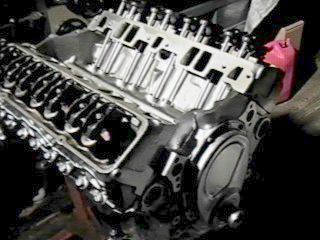
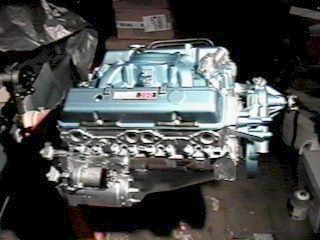
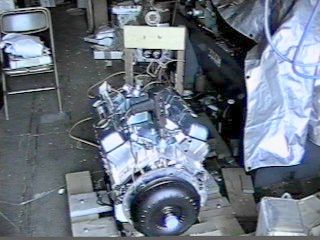
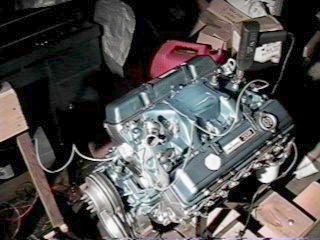
After a
long pause (Chuck Butcher shows up with the Dawg!) I returned to replacing the
other head. With my experiences
with the first one as a guide nothing exciting happened and picture ror9-6
shows the current status of Goody with both heads in place. I stuck in some junk sparkplugs and did
some masking so I could finish the silver paint job on the long block.
More to
come...
Rick Draganowski
Date: Sunday,
March 26, 2000 9:03 PM
With the
heads in place and torqued down on the block it was obvious that the milling of
the heads created a problem with the front and rear sealing surfaces for the
valley area. They were sticking up
considerable. I did not want to
disassemble the short block to allow the surfaces to be machined so modifying
the brand new Edelbrock Performer manifold was the only solution.
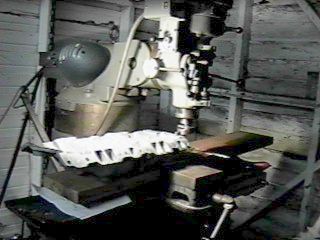
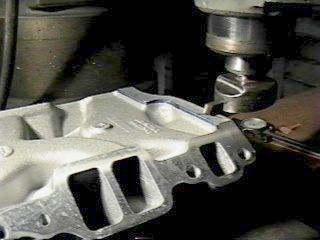
A trial
fitting with gaskets showed the Performer hard down metal on metal both front
and back.. I had calculated that
at least 0.060 had to be removed from the bottom of the Performer to allow it
to fit properly. To be on
the safe side I set up to take 0.070 off. See ror10-1.jpg and ror10-2.jpg for the setup I used
for the flycutting of the manifold.
(tooling a little crude, just a fir plank bolted to the carb bolt holes
on the manifold and then clamped in the table vise., but I am a crude kinda guy)
The last
picture shows the Performer in place on Goody with gaskets and torqued
down. The feeler gauge in the
front indicates a minimum of 0.023 and the rear gap has a minimum of
0.033.. Close enough for
government work..

More to
come...
Rick
Draganowski
(plenty of
room for some RTV)
Subject: Return of Rustpuppy report 11
Date: Wednesday,
March 29, 2000 11:31 PM
While the
manifold was in place for the trial fitting I checked as well as possible the
alignment of the ports to the head.
With an inspection mirror and holding a little flashlight in my teeth
like a burglar I could see the top of the port on the drivers side rear top
plane. It looked like a good
fit. I took a picture of the
concentric location of the bolt holes in the head versus the holes in the
manifold.
The milling of the head came out excellently well. Then the manifold came off for masking
in preparation of painting.
The next
step in the buildup of Goody was to install the valve gear and adjust the
valves. See the finished job at
ror11-3.jpg. I used ½ turn of
preload on the stock GM hydraulic lifters.
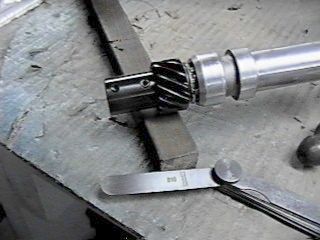
I used the
¼ crankshaft rotation and follow the firing order technique. I found the job much more fun and easy
on the engine stand while comfortably sitting down rather than leaning over the
motor in Rustpuppy like the last time in “The Flat Cam Project.”
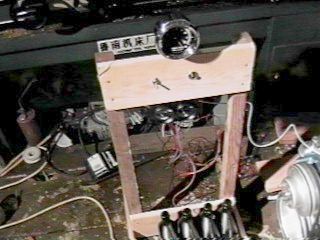
I filed
a little notch in four places on the crankshaft turning socket as a
reference.. (see ror11-4.jpg)
I was careful to gob a big blob of
the CompCams cam break in lube on the business end of each lifter as I
installed them.
The
pushrods seem strange to me. They
are straight heavy wall tubing with solid ball ends pressed into the ends. The are probably strong but they seem
quite heavy compared to the small block pushrods I am used to.
Then I
moved on to painting the Edelbrock Performer intake manifold. Oldsmobile blue.. The water pump, and stock valve covers
will be the same. I am going to
leave the Goodwrench decals on the valve covers and just mask them when I paint.
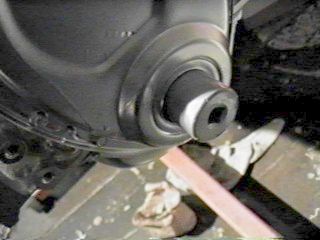
I
painted the vibration damper half silver and half blue so that if it starts
slipping it will be obvious.. I
also filed a notch in it at 30 degrees BTDC advanced to be able to check the
total advance without having to fix my dial back timing light. (lazy but effective) (see ror11-5.jpg and ror11-6.jpg)
More to
come..
Rick
Draganowski
From: Rick
Draganowski <dragan@harborside.com>
To: [NovaList]
<nova@seas.smu.edu>
Subject: Return of Rustpuppy report 12
Date: Thursday,
April 06, 2000 10:58 PM
After
making sure that the modified Performer intake manifold fitted properly up to
the milled heads on Goody it came time for the installation. It started well with the RTV going on
the water passages of the neato FelPro premium intake gaskets (with the little
metal inserts for the crossover passages and the teflon o-rings on the intake
ports). Then just as I
started to put the beads of RTV on the front and rear valley rails my damn tube
of RTV stopped up internally.
I was beginning to feel like the LesMiserabbit and out of desperation
snipped off one corner of the tube to get the RTV out. That worked in a messy way and I wound
up with a handful of RTV. The
beads were sloppy and uneven but I pressed on regardless.. I punched out the masking tape on the
ends to get a grip on the manifold and lowered it into place. It looked like a winner but I would
have been happier if more RTV squirted out from the rails front and rear.. Oh well.. If it leaks I will know why..
Then I
inserted the 1” stainless bolts for the manifold (the flanges on the Performer
are thinner than stock and the 1 ¼” bolts are a bit too long, Caution! 1 ½” bolts
used on the Performer manifold would rub on the pushrod on the center front
passengers side and center rear drivers side). I was careful to smear a bit of teflon paste on the four
center bolts to prevent the oil migration to the top of the manifold. I torqued the bolts to about 20 lb
ft. (just by feel) and the center
front one gave me trouble as usual since there is not enough clearance next to
the bolt head to allow the socket to go on very far.. But I muddled through.
Then I
put the spiffy 2-tone vibration damper on using the long bolt and stack of
washers technique.. I was careful
to put some grease on the surface of the damper the seal rides on so I would
not have a dry start messing it up.
Then the cad plated proper timing tab went on neatly.
I had
tried to get the studs which fit in the front flange of the water pump but NAPA
did not have them and could not order them. I got the pump from them but no studs. I am planning on running Goody on a
test stand in the shop and keep Rustpuppy in running condition so I can
position her for the motor swap when the time comes so I couldn’t swipe the
studs from Rustpuppy. I was
bellyaching about this to Tracy at NAPA and he suggested getting them out of
the 250 six laying around in the back of my shop. Duhh.. I never even thought of that. A few minutes work had them in
the proper pump..
I had
finished painting the genuine GM (rebuilt) water pump and it went on with some
2” stainless bolts and black RTV on the gaskets on both sides. The rusty studs looked a bit off but so
what..
I filled
the holes in the manifold and water pump with 3 brass ½” pipe plugs (they cost
2 bucks apiece! and they say there is no inflation..). Goody will not have a heater hookup.
Then It
was time to put on a oil filter. I
use and recommend the NAPA Silver filter as it is rugged, effective, and not
too expensive.. I installed
the oil filter adapter and relief valve assembly. (it didn’t come with Goody, I
got a used one for 10 bucks from Scott the machinist at NAPA) I had heard to
place the relief valve away from the block since it shrouds the oil passage a
little if you put it on the other way.
I oiled the gasket and spun on the filter and then took it back off to
verify the gasket sealing area. It
looked good so the filter went back on and hand tightened.
Then I
put the neat 50 buck rebuilt starter (also from NAPA) on with some new bolts (2
bucks each). I have another old
starter from the 400 motor but It is worth more than the 16 buck core charge so
I am keeping it as a spare.. (spare electrical stuff is good)
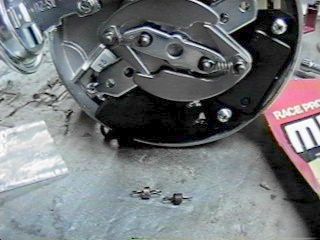
I
thought that before buttoning up the valve covers I would torque the head bolts
one more time. I am glad I
did. The CopperCoat sealer had
migrated a bit and relaxed the torque on five of the 34 head bolts. With the little flanged ½” head bolts I
could get a long 6 point socket between the rocker arms and torque the heads
without disturbing the valve adjustment.
Neat idea GM had.. (See
ror12-1.jpg)
Then the
valve covers went on (reusing the stock gaskets glued inside but putting grease
on them to keep them from sticking) with some stainless ¼-20 X 1” bolts and 4
of the extra heavy Moroso hold down tabs on the low sides and the factory tabs
on the high sides. They are gold
iridite and look a little out of place on the silver and blue motor but I like
them. At least they are not
chrome..
I
invested in another one of the splendid cast iron water necks and painted it
silver to contrast with the blue manifold.. More RTV and stainless bolts and it was in
place..
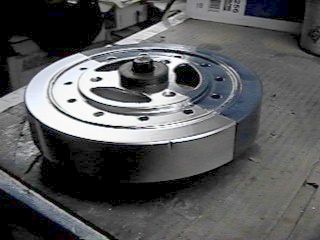
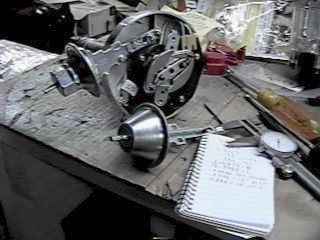
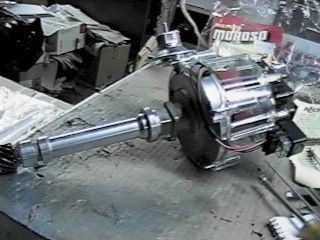
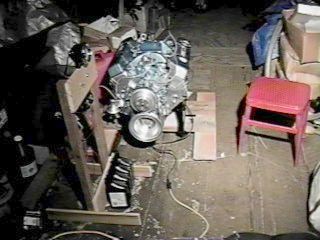
The last
picture show the current status of Goody.. I expect to have her running on the test stand soon..
Rick
Draganowski
(still
having fun..)
Subject: Return of Rustpuppy report 13
Date: Sunday,
April 16, 2000 11:39 PM
This is
a mixed bag of odds, ends, and waiting for parts. Since I have become determined to run Goody on a “Test
Stand” in the shop it has been a battle of details to get Goody ready to run
and a place for her to run on. I
am determined to keep Rustpuppy running to the last moment to allow driving her
to the motor transplant area so that left me short a lot of bits and pieces.
First I
needed to get the waterpump turning.
I scrounged a top pully from the 250 six and the crankshaft pully from
the 400 motor. Then I was faced
with connecting them with a belt.
It has to be the exact size as there is no adjustment since I am just
running the two pullies. I needed
a 34” 7/16” wide belt. My NAPA
informed me that they only had metric belts now and they are not really the
same sizes. I got a belt that was
supposed to be 34 1/8” but they must measure it in a strange way as it came up
short. The actual exact
measurement was 33 7/8”.. Pressing
on regardless I cut and spliced (by sewing with stainless wire) an old fan belt
I had scrounged off the shrinking 250 six. It came out exactly right and looks like it will last as
long as it is needed..
I need a
radiator for the stand and “lo and behold” resting on the passengers seat in
The Junkyard Dawg is a splendid 3 core copper and brass Nova radiator in
excellent condition. I never
expected this..
(thanks again Chuck)
A bit of cleaning with a wire brush and straightening out of a few fins
and it looks almost new..
I had
hastily put the cast iron water neck on (with a little RTV) and after thinking
about it for a day or so realized that I had completely forgotten about the
thermostat. This kind of stuff is
happening more and more to me..
Hmmm..
I had
the old thermostat from Rustpuppy left over from when I did the “Flat Cam
Project”. First a little cleaning
with a scraper and wire brush and then the neck had to come off and clean up
the old RTV and then it was in place with new RTV.
I had
ordered a chrome distributor hold-down from Northern Auto Parts as I was sure
that I did not have one. I thought
of the trouble I gave Rob over his and thought about ways of removing the
chrome. But when I was scrounging
around in boxes for the thermostat I ran across a stock distributor hold down
clamp. I swear I have never seen
it before and have no idea how it got into my junk.
It
cleaned up nice with the wire brush and left a permanent impression of itself
on the shop floor outlined in silver spray paint.. Just before I put it on Goody with a ¾” long stainless bolt
I looked at the hole where the distributor goes and a cold chill went down my
spine. So I first carefully
covered the distributor hole with a double layer of masking tape as I know as
strange as things are going it was a sure thing that I would drop something
down there.. Then the clamp
was in place.
I had
originally planned to use the ordinary motor stand as the nucleus of the “Test
Stand” but found that it interfered with the starter motor after I (with a lot
of trouble) pulled it off the 400 motor in the corner and left the 400 sitting
on it’s pan. Regrouping I first
thought of welding up a special rig to mount Goody. The area I need cleared away for this type of project was a
total disaster would require help and a couple of days labor. So I fell back to ordering the “Deluxe
Motor Stand” from Jeg’s which
mounts only to the front motormount pads and leaves the rear of the motor free
to mount a transmission if you want.
It came on Friday and it is a splendid piece of equipment. Heavy and well engineered and it will
show up prominently in the pictures in the next report.
I have a
tach (Sun Super Tach II) on the way with a bunch of other odds and ends and
already have the Autometer mechanical water temp and oil pressure gauges for
the “Test Stand” console. I will
have a hand throttle and ignition and starter switches as well. All in stock and just need to come
together.
Due to a
brainfart of large proportions I lost track of the bag which contained the
7/16” by ¾” long dowel pin packed with Goody and intended for the crankshaft
locating pin location. I finally
scrounged one from Scott the machinist at NAPA (he pulled one out of a scrapped
crankshaft for me)..
I have
the flexplate from Northern and neato ARP 12 point mounting bolts. First I chamfered the mounting holes on the flexplate as ARP
demands as there is quite a fillet under the bolt heads. Then using some of the leftover
CompCams Moly lube on the bolts I torqued them sequentially and sneaking up on
the final number to 65 lb ft..
I was a little pissed to find the “locating hole” was a ½” hole and fit
loosely on the pin I had gone to quite some trouble to get.. Wish I would have known that I
could have left the damn pin out..
I will
be bolting on the 2200 rpm stall converter to act as a flywheel on Goody and
have a neat set of ARP bolts for that.
I have to
come up with the spring mounts for the test stand (going to use Goody’s stock
springs) and the control console.
Also I have a set of 2” ram’s horn manifolds and I have to cobble up an
exhaust system. There is some good
looking pipes and a muffler under the Junkyard Dawg that looks like it can be
pressed into service.
There is
a lot more and the next report will have pictures..
More to
come..
Rick
Draganowski
(wonder
where those pins are??)
Subject: Skinning knuckle
Date: Monday,
May 01, 2000 7:54 PM
I was
slowly putting the cheapo 2200 stall converter on Goody so she would have a flywheel
to run with on the test stand. I
was using the crappy ½” long 3/8”NC grade 5 bolts provided with the 97 buck converter by the
“ProMotive” torque converter people (has anyone ever heard of these guys?) and
the wrench slipped off.
The
angles were wrong and there was only about half of the wrench actually on the
bolt.. Anyway my favorite
knuckle (right hand, index finger, second knuckle) intersected the little
pointy part of the block bellhousing flange and peeled back a flap of knuckle
meat almost big enough to make a sandwich with.. Mebbe with mustard.
I was
planning on writing up the pretty long story of “The Return of Rustpuppy report
14” but since I have a splint on
my right index finger my typing skills are in the toilet..
Lots
more to come when I can touch type again..
Rick
Draganowski
(Goody is
bouncing on springs now..)
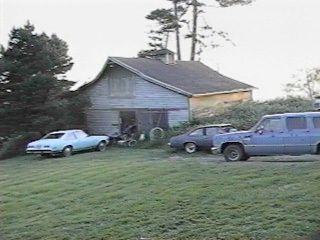
Subject: Home of Rustpuppy and The
Junkyard Dawg
Date: Sunday,
May 07, 2000 9:24 PM
I told
Mikael these would show up this weekend..
This is
from ½ mile up the hill above us..

Rick
Draganowski
Subject: Rustpuppy from afar..
Date: Sunday,
May 07, 2000 9:28 PM
Telephoto
pics of Rustpuppy taken from the hill above.. Medium magnification and full magnification..


The
grass is growing up all around her..
Sigh... Everything takes
too long..
Rick
Draganowski
(Goody
report real soon, I promise..)
Subject: Return Of Rustpuppy report 14
Date: Monday,
May 08, 2000 10:43 PM
This
episode is titled “Distributor Madness”.
Actually
it is not the whole story on the progress report on Goody, it is just a little on getting the
Proform Distributor in proper tune to work on Goody.
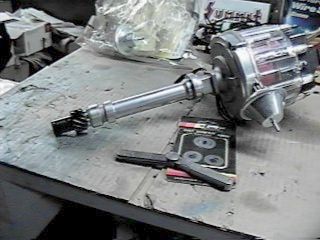
I am still
typing impaired so this is mostly a visual report.
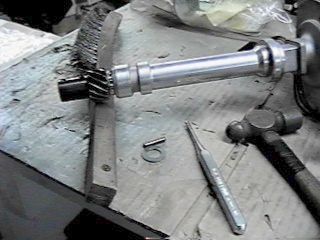
First I
checked the end play. I was
amazed to find a whopping 0.060..
Too much.
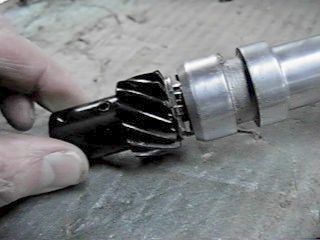
A moments work with a pin punch and the roll pin out and the biggest spacer in the distributor shim kit (0.050) in place between the thrust washer and the drive gear.
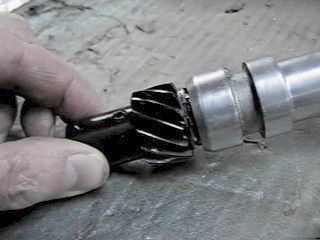
There is a dimple machined into the gear which lines up
with the rotor. It can go on wrong
if you are not careful. A recheck
of the clearance and it is right at a happy 0.010..
Then on
to the vacuum can. The stocker in
the “Proform High Performance” distributor is a stupid 25 degree unit.. Can you say ping? All wrong again. The vacuum can in a HEI moves about
1/8” for every 10 degrees of crankshaft advance. I had the Accel adjustable job already set up at 10 degrees
so in it went..
Then on
to the centrifugal advance. Nice
looking powdered metal weights (first I have seen) but really heavy
springs.. Bet the total advance
would not be in till about 4500rpm
like stock again. I wonder
about the coil voltage since everything else is wrong for performance.. Sigh.. It was cheap though..
At the time.. I pawed
through the leavings in the Moroso advance curve kit and found Too Strongs and
Too Weaks. Just Rights seem
to be in Rustpuppy’s old distributor..
Hmmm.. What to do..
Mixed
one Too Strong with one Too Weak and will bet that it is close to Just Right...
Buttoned everything up and it is ready to go into Goody
tomorrow..
More to
come..
Rick
Draganowski
Subject: Return of Rustpuppy report 15
Date: Wednesday,
May 17, 2000 10:15 PM
Rustpuppy
got moved today. Some precious (to
me) seat time. Poor
Rustpuppy has been languishing for months with the grass growing up around her. (ror15-1.jpg)

Today I
got in and after enough cranking to prime the Q-jet she started right up. Still sounding good except for “the
knock”.. I made a big circle
in the yard and parked her into position where the motor transplant will take
place. You can see my shabby ol’
Barn/Workshop, Rustpuppy, the Junkyard Dawg, and my scabby looking Suburban in
this picture..
And the
last one is of the Suburban..
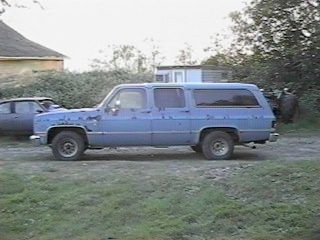
Every time I look close at that old land battleship I have
images of a 3” lowering job, about a 4 inch section out of the body at the
beltline, and a 4 inch top chop..
Then with the simple addition of some Kandy Apple Blue paint, and a 502
crate motor turning a TH400 tranny the vision is complete... Mebbe someday..
Anyway
the next report will be on the Return of Rustpuppy and the Goody Test Stand
(just inside the door of the Barn)
Real life keeps interfering with my Nova projects though...
Rick
Draganowski
(too
many projects, not enough time, never enough money..)
Subject: Return of Rustpuppy report 16
Date: Tuesday,
May 23, 2000 12:08 AM
Progress
has been made on the test stand for Goody. I flanged up a wooden cradle which bolts to the bottom of
the neato premium engine stand that Jeg’s sells. Under the cradle out of sight are four of the stock
intake valve springs removed from Goody during the cam transplant. It makes a nice bouncy cradle to absorb
the motor vibrations. I also
cobbled together an instrument panel with a new Sun Super Tach II (the one with
“Magnetic Suspension”) and a toggle switch for the ignition and a push button
for the starter. Under the
switches is a mechanical oil pressure gauge and temp gauge set. (nice Autometer
gauges from Northern Auto Parts)
The 20
buck (from Jeg’s) pre-oiler is well worth the dough and should provide a
lifetime of service.
I hooked
up the oil pressure gauge making sure to use sealant on the pipe threads and to
properly torque the teensy fittings which crush to the teflon tubing.. You have to feel the brass
ferrules crushing but not go too far.
Experience is the best teacher here. (my first mech exposure was repairing lawn mowers and other
equipment for seventy-five cents an hour back when I was a kid.. and they used
tons of them teensy lines, copper not plastic though)
Then the
pre-oiler was in and my little (but damn noisy) electric drill in place. I ran the drill watching for leaks and
monitoring the oil pressure.. It
slowly came up to about 30 psi..
Cool! It was the first time
I have ever done this.. (never
cared this much about a motor before either) I ran it for about 5 minutes and will run it for 10
minutes more tomorrow when I find my nice quiet drill.. Then it is time to put in the
distributor and wire everything up..
The harness for the instrument panel can be seen bunched up behind it.
I got a
new set of Walker Dynomax JetHot coated headers (about 210 bucks from Jeg’s)
for Goody and will flange up some kind of exhaust system to spare Marie (my 75
year old neighbor) the insane noise of running with open headers.. I plan on salvaging the old
single exhaust system out of the Junkyard Dawg and plumb the output of the
headers down into the single turbo muffler.. Quieter is better for now on the test stand..
Much
more to come...
It won’t
be long now..
Rick
Draganowski
(having more
fun than should be legal..)
END OF
CHAPTER 2
![[ Back Button ]](../gif/t_back.gif)
![[ Go Home Button ]](../gif/t_home.gif)
![[ Next Button ]](../gif/t_next.gif)