Subject: Supernatural influences??
Date: Wednesday,
November 15, 2000 8:25 PM
The rain
stopped for a few hours today so I got to spend an hour farting around with
Rustpuppy.
I was
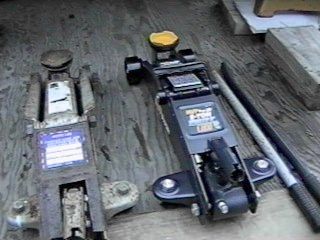
lining up my ducks for the axle removal. (getting all the needed tools and equipment together)
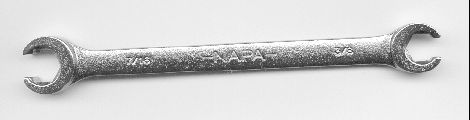
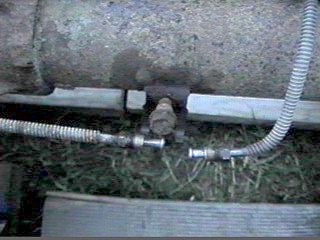
I need
the 7/16 tubing wrench for the brake hose fitting. I could not find the 7/16-3/8 tubing wrench
anywhere.. I have had the set of
tubing wrenches for 15 years and they have always been there before.. (I try to put my tools away after using
them)
Then I
remembered that I had just (about 2 months ago) bought a high zoot set of
crowfoot tubing wrenches.. (well
mebbe medium zoot as they are the 25 buck NAPA Taiwan jobs)
I got
them out and found that the 7/16 one (clearly marked) was actually a 13mm
one.. Bigger than the ½”
job.. What is going
on??
And when
I was putting the Lakewood bars on my 11/16” deep sixpoint socket turned up
missing.. ( I have had that set of
sockets without losing one since 1967..)
What is
going on?
Is
someone trying to tell me something?
Rick
Draganowski
(bad weather
and bad luck.. bummed out in
Oregon)
Subject: Tubing wrenches and wet
traction
Date: Friday,
November 17, 2000 8:13 PM
I took
the screwed up set of Taiwanese crowfoot tubing wrenches with the 13mm version
of 7/16” back to NAPA yesterday and gave Tracy a hard time about it. Having to order in the replacement set..
Anyway I
bought one of the high zoot NAPA jobs to replace my missing tubing wrench. It will probably turn up now to restore
balance to the universe. This one
little American made wrench cost $11.70..
Them cheap Chinese and Taiwanese tools are distorting my sense of value.
Now I am
set for the axle removal on Rustpuppy.
On
another subject entirely I took the Suburban to town last Tuesday in the middle
of the heavy rains.. I
decided to put the stock 235/70-15 size BFGoodwrench Radial T/A Long Trail’s
because I wanted better wet traction than the much wider tread General tires I
had before..
It
really paid off. The BFG Long
Trails have about twice the wet traction.
I did a few test emergency stops to get the feel of them and they are
really good wet weather tires.
Worth
twice what I paid because of this one feature..
Rick
Draganowski
(more sun
tomorrow, I hope..)
Subject: Return of Rustpuppy report 83
Date: Monday,
November 20, 2000 8:24 PM
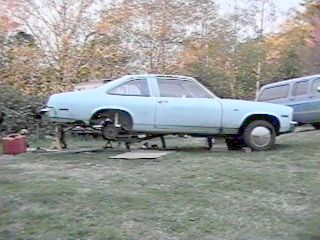
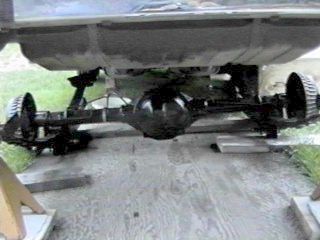
I still
haven’t heard back from my mechanic in North Dakota about the pricing on the
8.5” axle but I have been plugging away a little at a time on getting the 7.5”
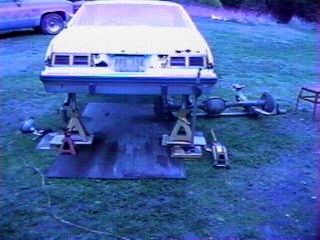
job out. In a desperate move to
get more room for my fat ol’ bod under Rustpuppy I put the front subframe up on
blocks. Since I was using three
stacked short 4x4’s for each block I lined one up to the long axis of Rustpuppy
and put the other one at right angles to the long axis. This prevents the possibility of
tipping the narrow blocks over when the heavy tugging starts. Then I jacked up the rear a bit more
and put 1 ½” blocks under the jackstands.
Plenty
of room for crawling around under there now.
Today we
had a break in the weather with reasonable temperature and dry enough (won’t be
really dry till next June or so) for some work. It extended past dark so I was out rolling around under
Rustpuppy with the droplight.
First I
set up a siphon to start draining the gas tank to get ready for dropping it
later. (I got most of it out) Then
I got to try out my new high zoot American made tubing wrench to get the brake
hose disconnected. Wow! it took about 40 lb ft of torque to
break loose the tiny 7/16” fitting.
Never would have gotten it off with vicegrips. The tubing wrench worked great though.
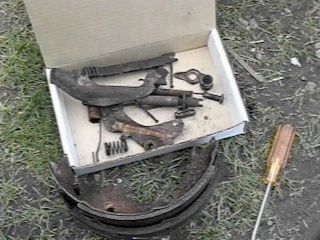
Then I
addressed the emergency brake cables.
It is cool having a car this old and this rusty on top with fully functional
factory emergency brakes. The
adjustment nut had to be backed off quite a ways so it was a pretty long
session under there with wd40 and oil fighting for each ¼ turn. But persistence paid off and I finally
was able to release the couplings on the cables and slide off the neat spring
clips which hold the flex cables to the frame bracket.
Then I
went through the drill of getting the driveshaft uncoupled from the axle. Shift to neutral, crawl under, rotate
driveshaft to make two bolts accessible, crawl out from under, shift to park,
crawl back under, remove two retainer bolts, crawl out from under, shift to
neutral, crawl back under, rotate driveshaft 180 degrees, crawl out from under,
shift to park, crawl back under, remove the other two bolts and push the
driveshaft forward enough to allow it to drop down. Whew!
I put a
ziplock baggie and some big rubberbands on the exposed u-joint to protect it
and prevent the cups from falling off.
While I
was under fooling with the stuff mentioned above I was thinking of the exact
technique I would use to actually remove the axle. I hit on this idea.
The six
smaller bolts holding the front spring retainer plates to the rear subframe are
in perfect condition so I am going
to remove them to drop the front of the springs/axle/traction bars
assembly. I replaced the bottom
rubber bushings on the rear shackles just 4 or 5 years ago so I know them two
bolts are in perfect condition. (didn’t do the top ones since the tank has to
come out for them, bummer) So just removing them frees up the whole kit and
kaboodle to be dragged out from under as an assembly.
More to
come..
Expecting
cold front and rain later tonight so it may be a while..
Rick
Draganowski
(slow and
steady)
Subject: Return of Rustpuppy report 83
addendum 1
Date: Tuesday,
November 21, 2000 6:17 PM
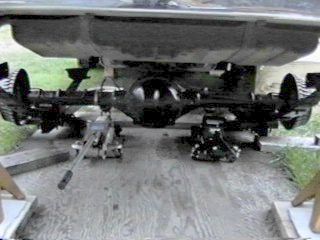
I
snapped these pictures today to go with report 83. And Chuck, to check the integrity of the jackstands and
blocking, I body slammed Rustpuppy both sides front and back (about a 200lb
hit) with no effect.
I spent a
minute underneath planning my next move.
I am a little discouraged about the way the filler on the gas tank
sticks out over part of the subframe to cause the tank to have to be pulled
forward and then down. I am
worried that it cannot be done without spilling gasoline on everything
including me. That would be a
disaster as I cannot afford to get that contaminated because of my Deloris’s
chemical sensitivity.
So I am
leaving the tank where it is and just working around it..
Probably
just spend a couple of minutes this evening and get the bottom of the shocks
free..
The
promised cold front and rain for today went south into California, (yay!) So the weather is still reasonable..
More to
come..
Rick
Draganowski
(crawling
around under rusty old cars and having fun)
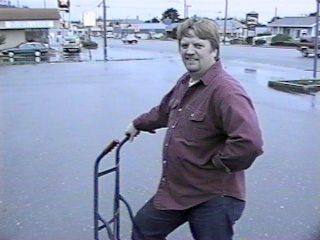
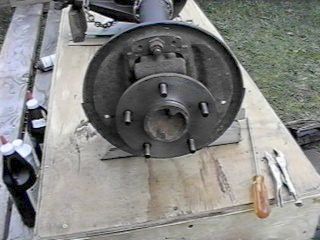
Subject: Return of Rustpuppy report 84
Date: Thursday,
November 23, 2000 6:04 PM
As I
mentioned in several letters about my quest for an 8.5” rear axle for Rustpuppy
I have decided on an expensive (850 bucks plus) solution. My only justification is that the axle
is not really for the Rustpuppy but for the future. The 8.5” axle that came stock in Junkyard Dawg is gone with
the miserable Ford 8” lurking there so the Dawg will need a proper axle when
the time comes. And since I am
planning on a pretty stout 406 motor for the Dawg it better be a reliable one.
When it
comes time for the Dawg to get the high zoot axle from Rustpuppy, the stock
2.73 7.5” axle from Yakima Sue will replace it.
So the
nice 10bolt 8.5” axle with the Torq-Line Posi and 3.73 Richmond gears is an
investment in the future and an affirmation of life.. (pretty windy sentence, heh..)
And
dropping that much dough out of the Nova Fund will discourage me from any more
Nova purchases for a while.. (have
a tendency to rush out in a buying frenzy.. and 3 Novas should be enough for
now..)
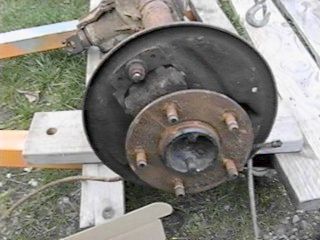
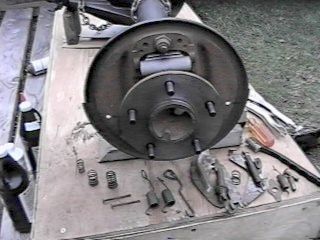
Back to
the business at hand. Yesterday I
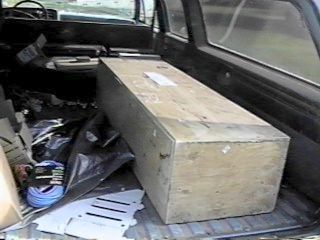
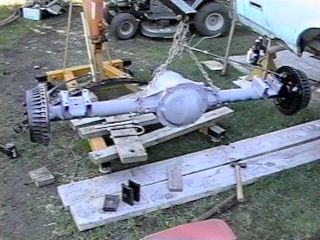
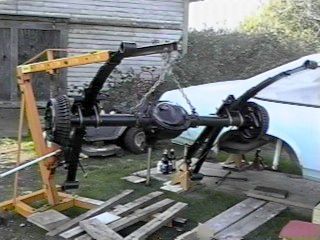
removed the 4 nuts holding the rear spring shackles together. Slow but fun work. Today I got a short window and
started by prying the shackles apart and dropping the rear of the springs. Then a few moments on the 6 spring
retainer bracket bolts and the axle was free. A few minutes of prying and tugging skidded it out
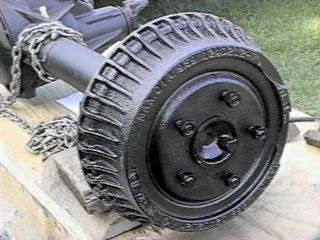
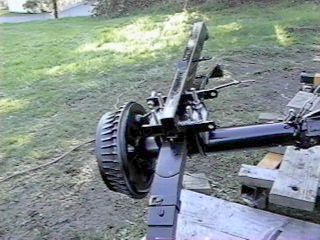
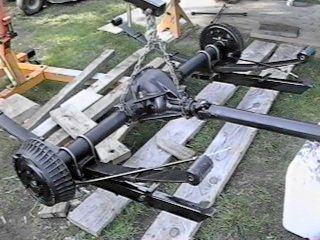
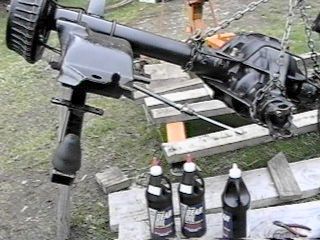
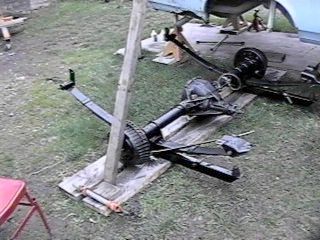
from under Rustpuppy. (ror84-1.jpg)

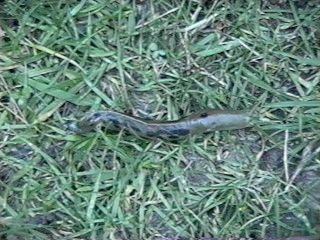
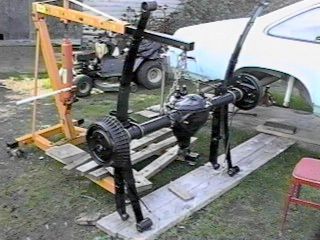
Ror
84-2.jpg shows my little assistant Albert. He was with me all the time I was working today. You know the giant slug is the official
State Animal of Oregon..
Have often dreamed of starting a football franchise here.. The “Oregon Slugs.” Catchy name, don’t you think? Albert is just a baby and if he is
still around when he grows up I may get a saddle for him and try to tame him
enough to use for hunting. Giant
slugs are a lot quieter than horses..
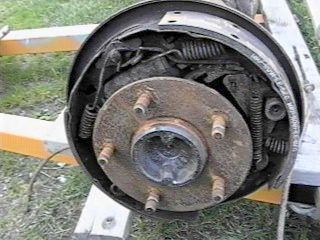
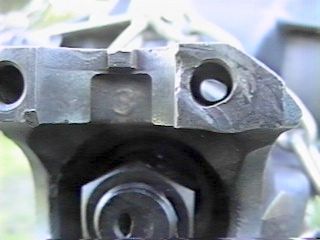
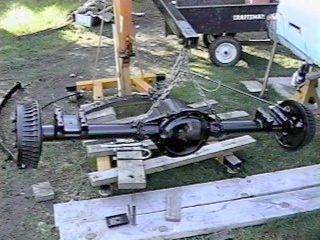
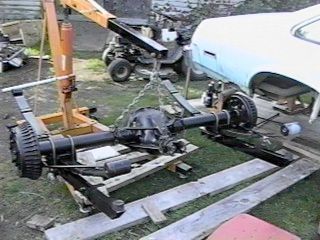
In the
closeup of the axle you can see where the pinion snubber was hitting before I
put the Lakewood bars on..
It will be interesting to see what exactly went wrong inside.. Sigh.. another autopsy.. I still haven’t got around to opening
up Knocker..
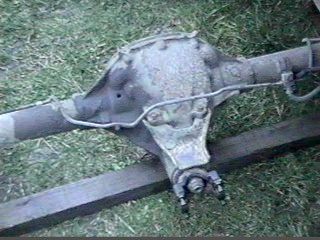
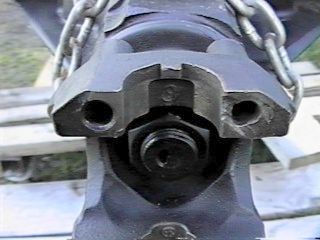
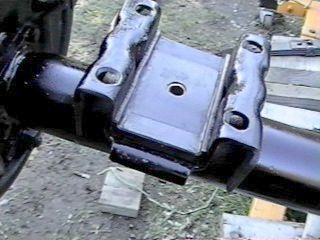
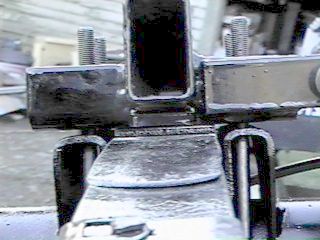
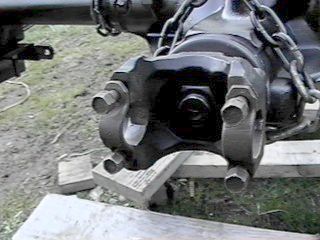
This
picture is for Alex.. See
the perfect 24 year old bolts which were holding the front spring brackets to
the subframe.. I
recall that Scott Windle had a bit of trouble with these. I wonder why GM used the cheap clipon
nutplates on these high-corrosion area critters?
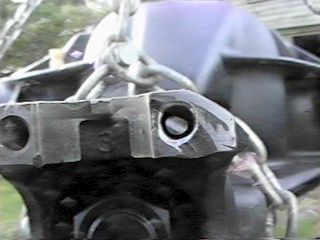
By the
time I took ror84-5.jpg the fog was creeping in and the light was going for the
day..
A small
step but an important one. Having
things out where you can get to them is good..
More to
come..
Rick
Draganowski
Subject: Return of Rustpuppy report 85
Date: Tuesday,
November 28, 2000 9:31 PM
Not a
lot of wrenching but a bunch of administrative work. I got a quote back from Richie Mulligan (the guy who
advertises in NNN.. see below..
“RICK...a
totally rebuilt unit from my stock with new 3:73’s, clutch pacs, bearings and
seals, drum to drum, less brakes+crated and ready to be trucked is $1070.- It’s
best to call me for payment & time frame arrangements, credit cards
accepted, my number is 973-786-6668.”
Anyway
that was lots more than I expected from some of the stories I been
hearing. I got another quote for
1200 bucks plus core and 300 for axles so you see the 850 bucks for a new
Torq-Line and the Richmond gears is not out of line.
But it
got better, I heard from my mechanic yesterday that he has located an axle with
the stock GM posi in good shape and the adjusted price is 700 bucks.. That includes new Richmond 3.73
gears, rebuilding the posi, all new bearings, and new seals... The backing plates are included
so I do not have to recycle the 7.5” jobs.. Pretty cool..
And he sez that the shipping will be about 160 bucks.. I dropped a 250 buck deposit on it in
the mail with a note urging him to hurry as Christmas is coming soon..
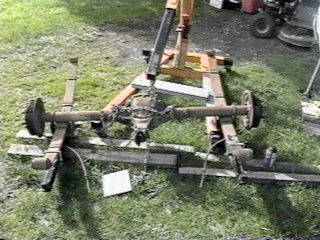
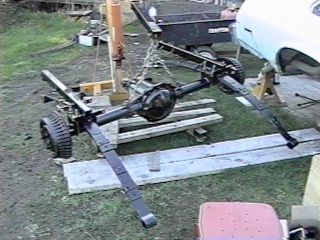
I
managed to find time to skid the little axle completely out from under
Rustpuppy and remove the spring mounts and shackles. I will only scavenge a minimum of bits off of this axle as I
find old junk valuable.. Alex’s idea
of using it as a dummy axle under the Junkyard Dawg and selling the Ford 8”
axle has some merit..
Scott
Windle warned me that the axles have a different dimension from the axle
centerline to the U-Joint so the driveshaft has to be shortened to allow the
bigger one to fit. He said about 1
inch.. I am a little bummed out
about the lack of interchangeability
(they could have used a short U-joint saddle on the big axle and a long
one on the little guy..
Because
of the kindness of good ol’ Ben Meissner I have a nice set of used 8.5” 3.08
gears and the 7.5” axle is just laying around so I made some crude
measurements. From the axle
centerline to the end of the pinion shaft on the 7.5” axle is about 10 ½” to 10
5/8”.. (I said crude) And on the 8.5” gearset from the center
of the ring gear to the end of the pinion shaft (when the gears are meshed
approximately correctly) is almost exactly 11 ¼”...
Hmmm.. There is a definite difference.. My crude measurements come up with
about 5/8” to ¾” and that does not predict where the U-Joint will actually be.. I bet it is close to the one inch
that Scott warned me about.. (he
knows everything.. I am not
worthy..)
On
another front, Yesterday I “Rushed right out in a buying frenzy!” and called
Espo (Springs-N-Things) about an E-Mail quote that Laura sent last week. Before I could stop myself I ordered
new rear springs. (90 bucks plus 10 bucks to push out rubber front bushings
plus 25 bucks shipping or so for a total of 125 bucks for the springs)
And I
then I got even more crazy and ordered polyurethane front spring bushings,
shackle bushings, and those rubber pad thingies which sandwich the
spring.. Plus I needed the 3”
U-bolts for the big axle.. The grand total came to about 246 bucks.. Oh well, Christmas is coming and I have
to put the good axle on somehow..
The spindly
little axle uses 2 5/8” axle tubes versus the beefy 3” jobs on the good axle..
I have
been starting Goody up and running her up to operating temperature every
day. Sort of a pathetic imitation
seat time.. I am hoping to
run out all the remaining gasoline from the tank so I can safely drop it for a
serious cleaning, painting and sock replacement.. I just love the sound of that eager little motor..
More to
come..
Rick
Draganowski
(waiting for
Christmas..)
Subject: Thoughts about shiftpoints
Date: Saturday,
December 02, 2000 11:25 PM
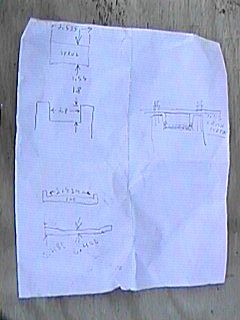
While
waiting patiently for the new axle to arrive for Rustpuppy I did some
calculating and plotting on shiftpoints using the 3.73 ratio..
With the
14” wheels and the 245/60 tires the speeds at the redline of 5700rpm (self
imposed based on just feelings so far) come out as below..
First
gear------- 0 to about 43mph (2800-5700)
Second gear
-- 43mph to 71mph (3430-5700)
Third gear
------ 71mph to 109mph(3730-5700)
This
seems to make a nice complement to Goody’s torque and horsepower curves..
I pasted
together this chart showing an approximation of the combination of all three
gears..
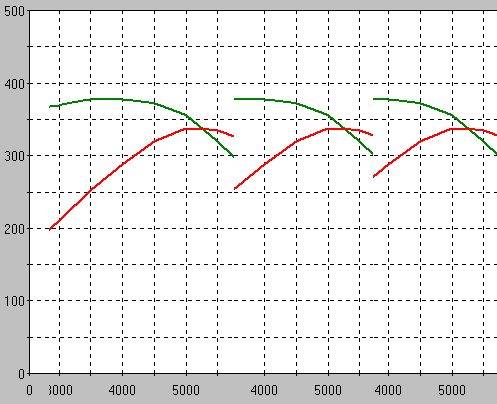
Goody
comes off the line at about 28-2900rpm due to the stall speed of the
Break-A-Way.. After that it
looks like she would be pulling hard..
I can hardly
wait for the reality..
Rick
Draganowski
(waitin for
Christmas)
Subject: Return of Rustpuppy report 86
Date: Sunday,
December 03, 2000 8:58 PM
I pulled
off the too-short flex brake hose on the old axle and took it to town last
Friday. Tracy at NAPA researched
his books and found a replacement part which is 4 inches longer. That should take some of the stress off
of it.. (the NAPA white shocks
seem to be about an inch longer stroke that the stock ones so the hose catches
hell) While I was there the guilt
of thinking about recycling the old wheel cylinders and brake shoes out of the
little axle into the high zoot one overcame me. So I plunked down 56 bucks for new wheel cylinders and
premium brake shoes.. There
is never an end to places to spend money on these wonderful old cars.. (I mean vintage, excuse me)
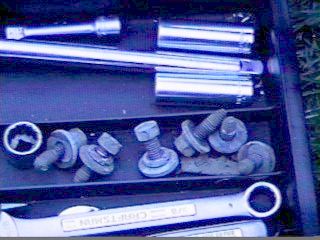
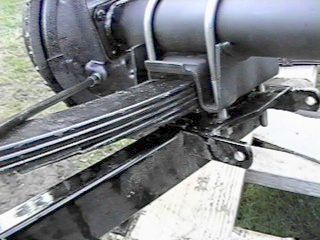
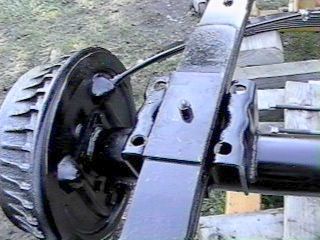
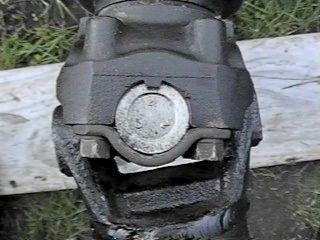
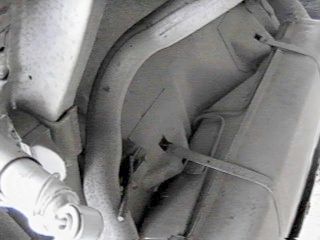
Ror86-4.jpg
shows the condition of the old hardlines on the rear axle..
Still
lookin nice and I probably will have to use them on the new axle..
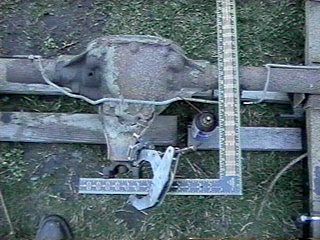
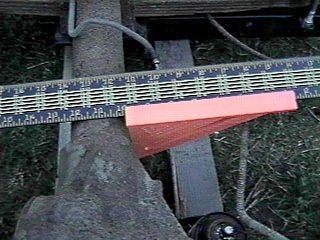
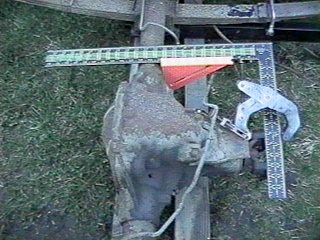
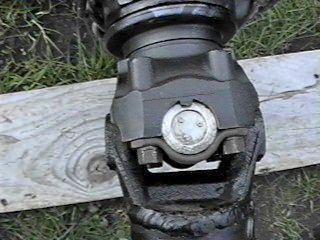
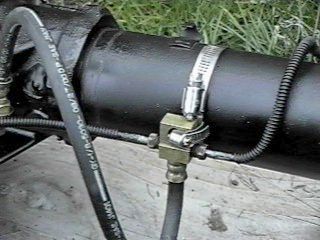
Ror86-1.jpg,
ror86-2.jpg, and ror86-3.jpg show the measurement rig I flanged up to get the
dimension from the front parting line of the U-Joint yoke to the front of the
axle tube. The dimension seems to
be almost exactly 9 7/8”.
The tubes on the 7.5” axle are 2 5/8” diameter. This works out to 11 3/16” to the
centerline of the axles.
Now if I
only had access to a 8.5” axle I could compute the exact difference in
dimension so I could verify the 1” number from Scott Windle. I want to get the driveshaft cut
and ready to go in when the axle arrives.. Scott was not 100% sure of the one inch number and
cautioned me to measure to make sure before cutting the driveshaft. I cannot just swap in a stock Nova
driveshaft made for the big axle as I am using the long tailshaft tranny out of
my old truck in Rustpuppy..
Can anyone help? Just
the measurement from the front of the axle tube to the yoke parting line..
More to
come..
Rick
Draganowski
(little by
little.. progress is made..)
Subject: Second thoughts about
shiftpoints
Date: Sunday,
December 03, 2000 8:16 PM
Chuck
Butcher responded to my first message on this subject with some good
information and a suggestion to use 6200rpm instead of 5700rpm for the shifts.
I worked
up the graph and it looks like he is exactly right..
The
numbers for 6200rpm are:
First gear
------ 0-47mph 2800-6200rpm
Second gear
-47-78mph 3750-6200rpm
Third
gear-----78-118mph 4100-6200rpm
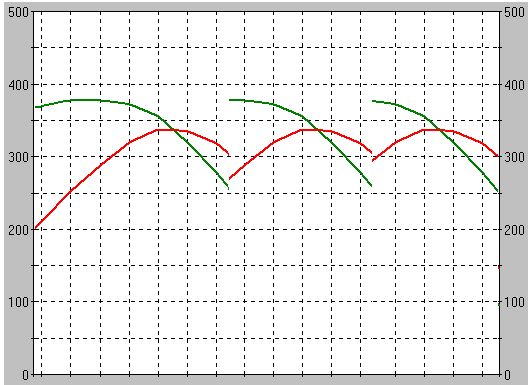
Notice
the horsepower curve is close to being connected.. Cool..
Rick
Draganowski
(having fun
with numbers)
From: “Rick
Draganowski” <dragan@harborside.com>
To: “[NovaList]”
<nova@seas.smu.edu>
Cc: “[Steve
Moore]” <doc3544@aol.com>; “ben
meissner” <bm57@email.byu.edu>
Subject: Return of Rustpuppy report 87
Date: Monday,
January 22, 2001 5:58 PM
Hoping
that getting back into “Return of Rustpuppy” reports will be good therapy.
Going
back to when the Rustpuppy was still on the road (before axle disaster) It was
very cool having the local rodders showing up in a little crowd each time I
stopped for gas. Rustpuppy may not
look like much but has earned a little respect from the locals. The kids seem really nice and
enthusiastic and it is good to be a big frog in a small puddle.
Knowing
that I will need one in the future I had my mechanic Wade in North Dakota build
up a race TH350 for Rustpuppy for the day (inevitable) when the ol’ truck
tranny in her now goes to it’s reward.
Wade sez it is equivalent to the B&M and TCI TH350’s but he only
charges 300 bucks.. The shipping
to me was another 85 bucks but well worth it. The “good” tranny is sitting in my shop, just waiting
it’s turn.
I leaned
on Wade to come up with an axle for the Rustpuppy to get back on the road. He (after several delays from suppliers
and other reasons) built one up with a 2 series rebuilt GM posi and new 3.73
Richmond gears with a spacer..
700 bucks for the axle but the shipping is a killer.. 266 bucks delivered. 136 to the terminal at Roseburg
and 130 to get it to “The end of the World at Gold Beach”..
So it
used up almost 1 large from the Nova fund. (been saving up for 4 years on the fund..)
Then those
most excellent plaques showed up.
I got one aluminum for Rustpuppy and 1 bronze for the shop.. What fun it was to open the
package from the foundry..
Ray, out
of an excess of competitive spirit decided to get an Autometer shift
light.. Naturally I had to
get one too.. Then I
aggravated Ray lots to get the poop together for an adjustable pill. Then, as you know, my
circumstances changed. Now it is
essential that I devote full technical time to getting my company out of
mothballs and back into production.
I realized that I could not afford myself anymore so I aggravated Jeg’s
for a proper pill kit. I actually read the Autometer directions and got the
part number there. The rpm’s are 5600,5800,6000,6200,6400.. That will cover everything I will
ever need.. Now I find
that the 5600 kit is listed in the new catalog. They must have had more complaints than just mine..
I
installed the shift light (just some wirenuts onto the Sun Super Tach II wires)
and a couple hoseclamps. It works
neato, as advertised. It is cool
that the tach and the shiftlight agree exactly..
I had my
mechanic Wade measure the U-joint flange to front of axle tube dimension on the
8.5” axle and report back to me.
It seems the driveshaft has to be shortened 1.3” for it to work with the
new axle. I whined about the
driveshaft problems to my NAPA folks and they tipped me off to a automotive
machine shop down in Brookings (about 40 miles away).
I took
the driveshaft down and left it with Chuck ( a cool guy who builds motors for
the local circle track crowd ) and he had it done in a couple days. I had him straighten and balance it
too. The U-joints on the
driveshaft only had about 8k miles so I expected them to be perfect. Chuck inspected them anyway and found
the front joint was rough..
He sez if there is not enough angle in the driveshaft to work the joints
that they brinell and turn nasty from operating in the same place too
much. With the sagging rear
springs (to be replaced with new stock height jobs I got in from ESPO) the
driveshaft angle was non-existent messing up the front u-joint. The rear joint was ok because of the
pinion down-angle working it..
I never knew this detail..
I went
ahead with the JCWhitney seat cover (saddle blanket style) installation. Ol’ Ray sez that you gotta pull the
seat to maintain your sanity during installation. But I got the seat in a modified location (cause of my long
legs) and it has to be moved all the way forward to get to some of the
bolts. Anyway the shifter is now
in the way and taking it out is no easy task since it was put in before the
motor-transmission assy and the nuts are not falling to hand any more..
So today
I decided to hog ring the daylights out of it where I can reach and just hope
for the best. Crude but effective
like all my stuff..
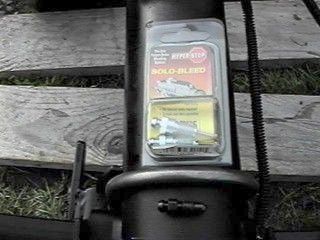
On
another front I ordered the Earls Solo-Bleeds for the new rear wheel cylinders
(and a set for the front calipers for the future) They came today.
The last
pent up episode in the story is about the expensive ride my new axle is
getting. It left Velva ND
(no wise cracks, it is like the cheese, not the other) and turned north to Minot.. Then it took a 900 mile
detour to Minneapolis.. It
hopped a train in Minnesota and headed for Seattle.. Today I found out it is in Portland OR..
So I
expect it later this week mebbe..
I am
tired of typing..
More to
come..
Rick
Draganowski
(moping but
still going)
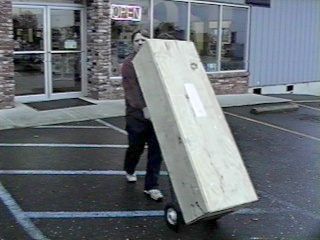
Subject: Return of Rustpuppy report 88
Date: Friday,
January 26, 2001 6:25 PM
Yesterday
about noon the far wandering axle showed up at the NAPA in Gold Beach. (It started in Velva ND and went to
Minot ND, Minneapolis MN, Seattle WA, Portland OR, Roseburg OR, and finally
here to Gold Beach OR)
My stalwart
friend Tracy (cool NAPA counter guy) is self-consiously posed next to the neat
crate that Wade made for it.
(ror88-1.jpg)
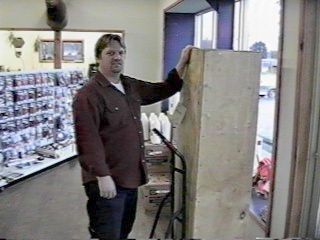
The box
weighs 185 lbs so Tracy popped it into the Suburban in a jiffy. Then posed again (in the rain) for the
final pic of the day..
(ror88-2.jpg and ror88-3.jpg)
Today
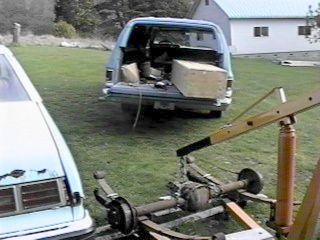
dawned bright and sunny so I had a chance to mess about with the new axle. Ror88-5.jpg shows the box in the sun in
the Suburban. Ror88-6.jpg
shows the poor overstressed and washed up 7.5” axle waiting for the scrap heap.
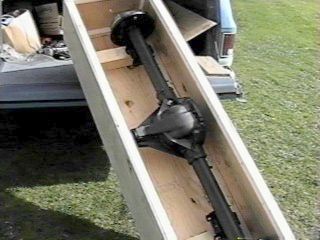
I
carefully slid the box out and removed the cover. Looking good! (hope it is worth the one large) Then taking
my time I maneuvered it over to the staging area. (ror88-7.jpg, ror88-8.jpg, and ror88.9.jpg)
Notice
the traction bars and springs have been stripped off of the old axle and the
new job is sitting up where I can get started on rebuilding the brakes. (ror88-10.jpg, ror88-11.jpg, and
ror88-12.jpg) Rustpuppy can be
seen waiting patiently to get back on the road in ror88-11.jpg..
I found
the original Haynes Nova manual I bought back on April of 1993. (still had the NAPA receipt inside)
That is when I first got Rustpuppy and before all the rust showed up.. It has been longer than I thought..
More to
come..
Rick
Draganowski
(making
progress..)
Subject: Return of Rustpuppy report 89
Date: Sunday,
January 28, 2001 7:49 PM
The day
dawned yesterday bright and sunny so I started digging into the brakes on the
new axle as soon as I finished my third cup of coffee..
I have
forgotten just how much I hated doing brakes but it all came back to me this
weekend. And in the last 8 years
since I put new linings on Rustpuppy (last brake work I done) I seem to have
forgotten everything I once knew about making the job easier.
I
started by stripping down the nasty passenger side brake that Wade put on the
axle for free.. It was worth about
that much. (ror89-1.jpg) The bits
were kind of eaten up by road salt so I decided to clean up the nasty looking
but much nicer salt-free bits from Rustpuppy’s old axle.
The passenger side wheel cylinder spit up some really
nasty stuff on the old axle. It
was past due for replacement..
Real “Exorcist” looking stuff..
(see ror89-2.jpg)
I
cleaned and wire brushed the bits from the old axle and the backing plate of
the new getting ready for the amazing puzzle which is the reassembly process by
an ol’ idiot.
Note
that the NAPA folks gave me the wheel cylinder for a late 76 Nova and I needed
one for the earlier version.
(ror89-3.jpg)
It was a
good thing that it was Saturday as I jumped into the Suburban and raced to town
to get the right wheel cylinders.
While I was there I picked up the axle lube and brake fluid as
well.. (why is it
always this way?)
Amazingly
enough I managed to get it together (I hope correctly) and only hurt myself a
little bit..
(ror89-4.jpg)
Today
(Sunday) it started sunny but the clouds were rolling in by the time I dragged
my aching butt out to get the other side done. I started on stripping down the drivers side of
the old axle to salvage the ugly but almost rust free bits I would need. (ror89-5.jpg)
I
cleaned up the brake drum, did the initial adjustment and buttoned up the
passengers side of the splendid new 8.5” racing axle.. (ror89-6.jpg)
Ror89-7.jpg
and ror89-8.jpg show the drivers side brakes stripped down and the salvaged
bits from the old axle (I call her “Whiner”)
It was
the work of just a few minutes to clear away the brakes on the new axle
driver’s side. I think I am
getting the hang of this crappy job. (I would hate to do this for a living, as I am too
slow to make minimum wage at it..)
(ror89-9.jpg)
After
much cleaning up and wire brushing I got the bits and the backing plate looking
presentable. (it takes about 1.5
hours for each cleanup.. Too
slooww..) (ror89-10.jpg..
And
finally just at dusk I got the driver’s side together. A cleanup on the drum and found that
the end of the axle was banged up enough to keep it from going on
properly. Several minutes with a
strip of 240 grit wetordry paper cleaned the burrs enough to let the drum on. An adjustment of the brakes (about a
turn out from hanging) and the second drum was buttoned up and painted pretty..
(too dark for pics)
I
expected rain tonight so hand tightened the brake lines into the cylinders to
prevent water from creeping into them and covered the other ends of the brake
lines with plastic bags. The
formed lines for the 7.5” axle are not correct but look like they will work
with some minor forming.. (old
tech word for bending them)
Hope the
rain goes away quick as I am getting anxious to get ol’ Rustpuppy on the road..
More to
come..
Rick
Draganowski
(nice productive
weekend, but not as much as I wanted..
Sigh.. I am too old, fat,
and crippled..)
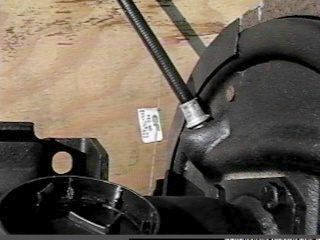
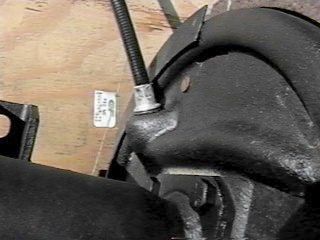
Subject: Return of Rustpuppy report 90
Date: Monday,
January 29, 2001 9:23 PM
Good
weather but my old bones were creaking today. Small victories and some troubling finds.
First I
was unhappy with the NAPA emergency brake cables. There was a big gap at the flangie thing which mated up with
the backing plate. I scrounged up
a couple ½” ID O-Rings and carefully slid and stretched them over things to get
them into place. Looks like a good
seal.. (ror90-1.jpg and
ror90-2.jpg)
The old
axle (Whiner) is getting ready for a ride on the hand truck. It will languish in front of the shop
till I get around to the failure analysis.. (much later..)
(ror90-3.jpg)

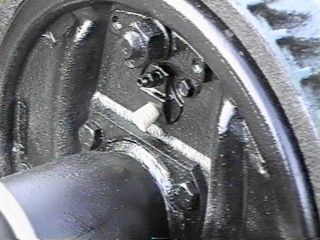
Then
something ugly showed up. I
cleaned up the U-joint saddles and bolts from the old axle and wire brushed the
paint off of the yoke on the new axle.
Turns out there is a right nasty gnarf in the yoke which prevented the
bolt from even starting into the threads.
I was quite disappointed in the quality control by Wade that let this
slip by. I cleaned up the mess as
best I could and at least the bolt works and it looks like it can be usable. But I worry about how much strength was
lost by the damage.. Goody
will be putting considerable torque through there.. Damn, it is always something.. (ror90-4.jpg and ror90-5.jpg show the
damage as found and ror90-6.jpg shows the cleanup)
Moving
right along I got out the new rear springs from ESPO and the polyurethane stuff
and 3” u-bolts.. 200 plus bucks
worth of stuff..
I
struggled with mounting the spring and traction bar on the passengers side
first. It was a difficult job and
much time was wasted. I had to
grind down the spring pads before I could get them to fit up into the spring
perches. Then when I finally got
the u-bolt nuts into place I started feeling like something was wrong.
Something
was wrong. The depth of the recess
in the spring perches on the new axle was only 1 ¾” while the old axle had a
depth of 2 1/8”.. What the
hell?? What is going on? It looks like the traction bar plate is
at least 3/8” from contact with the spring perch flanges.. I do not understand. I had though that the single leaf
spring perch was very shallow. The
perches on my expensive new axle are at some intermediate size??
Was
there an intermediate spring with fewer leaves?
WTF???
The new
springs I got from ESPO have 5 active leaves and a short spacer. (so do the old springs off Rustpuppy) I
guess I can take the short spacer out but that still leaves me at least 1/8”
from being right.. I picked
up extra nuts and internal star washers in town to double nut with lock washer
the u-bolts since they cannot be torqued down in a metal to metal
situation. I hope that will work
well enough..
It has
been a frustrating and difficult day and I am getting a little pissed
off.. And creaking like an
old gate too.. My old
arthritis is really getting to me after the last few days of frantic activity..
See
ror90-8.jpg..
Bah,
humbug!
I have learned
that when the axle is out of the car you_must_turn it completely over to put
the springs and traction bars on with any kind of ease.. I struggled with it the other way and
wasted half a day today..
Bah!
Rick
Draganowski
(Creeaakk,
snap, crackle, groan..)
Subject: Return of Rustpuppy report 90
Haiku
Date: Monday,
January 29, 2001 9:56 PM
removed
hasty paint
ugly sight
presents itself
yoke,
battered, Oh shit
mounting
heavy spring
something is
not even close
spring
mounts do not match
creaking and
groaning
ancient man
with ancient bones
gets bad
attitude
Rick
Draganowski
Subject: Return of Rustpuppy report 91
Date: Tuesday,
January 30, 2001 6:44 PM
Another
fine day for working. Rain had been
predicted for the last three days but they got it wrong as usual.. Nothing but beautiful sunshine..
I
stripped off the passengers side spring and traction bar I put on in a
half-fast way yesterday and spent the first half hour getting the axle turned
completely upside down. Now
that I could see the bottom it was apparent that the paint was sketchy at best
and rust was forming all over..
(half-fast paint job by the builder) I cleaned it up and gave it a nice coat of self-etching
primer.. (love that stuff) You can see the paleness in
ror91-1.jpg..
Then a
nice coat of cheap black enamel and things are ready for serious assembly.
(ror91-2.jpg)
This is
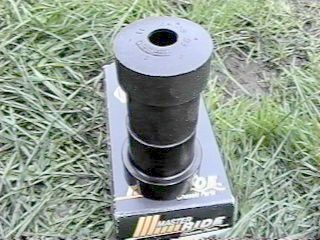
the passengers side spring perch with the tough urethane pad in place. I had to grind almost 0.100 off of the
edges to get it into the perch..
(ror91-3.jpg)
The
spring followed and you can see that it is sticking up about 1/8” or so.. (the pad will compress if I torque the
u-bolts enough..) (ror91-4.jpg)
Then it was fun to finish putting the u-bolts and traction bar on the
inverted axle. (it was a bitch
doing it the other way..
really....) (ror91.5;jpg)
The
other pad and spring was next..
Looking good..
(ror91-6.jpg) The
next pic is a close-up showing about 0.080 or so gap left but the nuts have
only about 30 lb ft of torque.. I
expect if I put 70 or 80 lb ft on them the gap will almost disappear.. See ror91-7. for the gappy stuff..

Ror91-8.jpg
shows the results of a fun day..
The springs and traction bars are on and I will do the final torqueing
of the u-bolts after the axle is installed. I bet the springs will not line up with the front spring
mounts so they will have to be fooled with.. I plan on double-nutting with a lock washer the axle u-bolts
since I may not get metal to metal contact and the urethane will slowly flow to
loosen things up..
The
final picture ror91-9 shows my notes and measurements which convinced me that
things would be just fine..
If the
weather holds for just a few more days ol’ Rustpuppy will be on the road!
Rick
Draganowski
(sunshine is
good)
Subject: Return of Rustpuppy report 92
Date: Thursday,
February 01, 2001 7:30 PM
After
getting the neat new ESPO springs on it was time to flip the axle over.. (easier said than done since the assy
weighs over 300 lbs.. ouch!) But I
got after it first thing.
(ror92-1.jpg, ror92-2.jpg, and ror92-3.jpg)
I
thought that now is the best time to check out the damaged u-joint yoke so I
went ahead and installed the driveshaft temporarily. Everything looked peachy-keen.. (ror92-4.jpg, ror92-5.jpg,
ror92-6.jpg and ror92-7.jpg) It is best to find out bad news before putting the
axle under the car..
I expect
rain almost every night so I was sure to put corks in the wheel cylinders to
keep out the water..
It was a
short day as I am a bit physically challenged today..
More to
come, sooner than you think..
Rick
Draganowski
(inspecting
stuff is good)
Subject: Return of Rustpuppy report 93
Date: Thursday,
February 01, 2001 8:31 PM
Another
day without rain (except it is raining like mad as I type this at 7:30pm) so I
got a lot of little things done on the axle replacement project.. I had cleaned up and painted the brake
lines and figured how I was going to mount them. Then I addressed the Earl’s Solo-Bleeds.. Cool invention and they were easy to
install.. (ror93-1.jpg) I also got the ¼” jobs, that I thought I was going to
need, today. Poop! It looks like Jeg’s has discontinued
the Earl’s Solo-Bleeds and is shipping the Russell SpeedBleeders instead.. Oh, well.. I got the four Earl’s I need for old Rustpuppy.
I got
busy on installing the front spring mount brackets and getting the shackles
ready. The, hard as a hockey puck,
urethane shackle bushings all had a pretty rough hole drilled in them. It looks like the cutter they were
using was too dull but they kept going anyway. Anyway all 8 of them had to be drilled out to the proper
size with a sharp 9/16” drill bit..
(ror93-2.jpg) After
drilling and with a little oil they worked slick.. (ror93-3.jpg)
(more crappy quality control, it wasn’t like this before the stupid ISO
9000 crap.. all the paperwork in
the world don’t make up for a lack of pride in your work)
Ror93-4.jpg
shows the spiffy spring bracket.
The other one looks the same except it is left handed..
This
next picture is specially for Alex Bilan and Scott Windle. It shows the drivers side front spring
bracket mounting area. Rustpuppy
may be really ugly and rusty topside where everyone can see but she is
rust-free and beautiful underneath, where it really counts. You can see why I love this fugly
ol’ car.. (ror93-5.jpg.. see the original paint under
there!)
I got
the replacement bumpers for the Lakewood traction bars. It really ticks me off having to strip
the excess rubber off the studs..
What ever happened to quality control and pride in manufacturing? Everything is done on the cheap
anymore.. (ror93-6.jpg)
You can
see why I needed new ones. I had
to really shorten the original ones cause the rear springs were saggin so
much. They were still gapless
too.. I hope the new springs make
a difference.. (ror93-7.jpg)
Before I
forget and fry my new axle I went ahead and filled it with the proper
lube.. (not going to use any posi
additive.. You will hear Rustpuppy
creaking and popping around the corners..) The 3/8” drive breaker bar makes a nice plug
wrench. (ror93-8.jpg)
I tilted the axle up at an angle to make filling easier
and put in about 2 ¾ quarts of lube..
(ror93-9.jpg)
It would
be very bad to have the flex brake line putting bending stresses on the steel
brake tubing (fatigue cracks eventually) so I flanged up a secure mount for the
axle end of the flex line..
(ror93-10.jpg... hose
clamps is good)
As the working
part of the day drew to a close I took the axle down from the hoist and made it
all ready to slide under Rustpuppy.. If it ain’t raining tomorrow it will be dirt in the
eyes day.. (ror93-11.jpg and
ror93-12.jpg)
More to
come..
Rick
Draganowski
(with
the weather change and the rains starting up again I am really creaking and
walking funny..)
Subject: Return of Rustpuppy report 94
Date: Saturday,
February 03, 2001 7:55 PM
After
the mild fit I had yesterday the rain stopped for about 2 hours in the late
afternoon. I forced myself to get
out and get going on the axle transplant project and stop whining and feeling
sorry for myself..
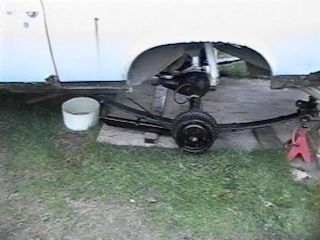
Anyway I
was faced with the problem of sliding the 320 lb axle assembly into place under
Rustpuppy. I used levers and
patience to skid it along an inch or so at a time.
(ror94-1.jpg)
I
crawled under one time to take a picture of the empty space where the axle
lives. GM painted stuff white
under there and most of the white paint is still there.. (ror94-2.jpg)
After
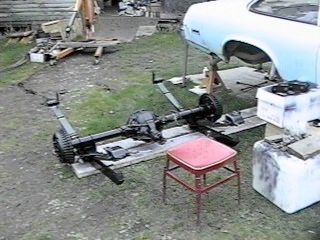
much levering and fooling around I got the axle close to where it should be..
(ror94.3.jpg, ror94-4.jpg) I
was having trouble standin upright and walking yesterday so I did 90% of this
part of the job sitting on the little red stool hunched forward..
I bought
a second floor jack from my local Ace hardware store. It looked pretty but is a malignant ill-conceived POS. It is one of those instant up one-pump
dogs and it is not reliable. It
only works about half the time you want it to and it is probably more than 5
times harder to lift stuff with than the old reliable jack (also bought at Ace
but about 6 years ago..) (ror94-5.jpg)
4000 lbs
my foot. It required a down
pressure of about 30 lbs to pick up 160 lbs (one of the few times it worked at
all) so with that ratio it would require a pump of 750 lbs to lift 4000.. I am taking it back and getting my
dough back ASAP..
And it
looked so pretty too.. Sigh.. (Chinese engineering at it’s best..)
Ror94-6.jpg
and ror94-7.jpg shows the axle waiting for final installation last evening..
Today
the weather and my physical challenges took a real turn for the better and
about an hour after noon a warm high pressure front came through and the rainy
stuff ended by two o-clock..
I dug right in on getting the front spring mounts bolted up loosely and
then farted around with the shackles trying to get everything lined up.
What a
bummer I found on the top shackle bushings from ESPO. Ror94-8.jpg shows a stock replacement rubber bushing from
NAPA sitting on top of the high zoot ESPO polyurethane job. It seems the ESPO bushing is exactly
0.025” bigger than the nominal 1.600 diameter of the holes in the frame. It would take a sledgehammer to get
them in and there is about 4” on the outboard side and 1 ½” on the gas tank
side clearance to work in.. BAH!
Why do
these things happen? I am
going to turn the polyurethane bushings
down in my
lathe to get them to the proper size but for now I went ahead
with the
stock replacement rubber bushings on the top mixed with the hard polyurethane
jobs on the bottom.. I
bet it will be a while before I get to that project.. Bah again!
Eventually
I got everything bolted in loosely and then put some weight on the axle and got
the shocks mounted. Then I
lifted the axle almost to the point of pushing Rustpuppy up off the frame
jackstands and crawled around tightening everything up. I will retorque the U-Bolts tomorrow
and put the locknuts on them as they are still a tiny bit from metal to metal
and the urethane will flow and loosen them up..
Ror94-9.jpg
shows the final state at the end of today’s 3 hour struggle..
(I am so
slooww!)
Now it
is time to hook up the brake flex line, bleed the brakes, install the
driveshaft, mount the wheels, and get
Rustpuppy
off of those jackstands and ready for a test ride!
And I
got to go to town for gasoline. I
drained all of the gas from the tank thinking I was going to drop it for
maintenance and changed my mind.
The gas I drained got used up by the riding mower (it didn’t need
premium) so a short roadtrip is necessary.. Mebbe tomorrow..
More to
come..
Rick
Draganowski
(still
walking funny but making progress)
Subject: Return of Rustpuppy report 95
Date: Sunday,
February 04, 2001 10:17 PM
Went to
bed early hoping for an extra long sleep but 730am found me wide awake and
eager to get back into the Rustpuppy axle project. I sat and took it easy while drinking my morning coffee and
annoying the list with morning messages.
Then the sun came out!
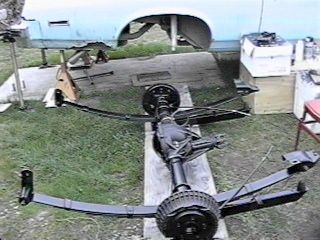
By the time I got out to the project area the sun was beating down. (Ror95-1.jpg) It was even shining on the axle a little bit.. (ror95-2.jpg)
I started
out by getting down and torquing the daylights out of the axle mount
u-bolts. Came close but still a
hair off of metal to metal contact so I put the double nuts plus internal star
washers locking devices on.
(ror95-3a.jpg)
I got
the flex line hooked up to the hard brake line and then I tried out the neat
Earl’s SoloBleed brake bleeders on the rear cylinders. They worked perfectly! It was a real pleasure doing the brake
bleeding this way. I monitored the
fluid level and made sure it was topped off. Excellent new adventure!
Then I
got the driveshaft ready to install.
I had it shortened 1.3” to compensate for the differences between the
7.5” and 8.5” axles. It took
longer than I expected to install the rascal because of trapped air in the
internal spline kept pushing it back out when I got into proper position. After much struggling I was able to pry
the driveshaft forward against the air pressure enough to snap the u-joints
into the saddles on the yoke..
I see what the little hole is good for in some of the driveshafts. Anyway with most of the weight off of
the rear wheels there is about 1 ¼” of clearance for the slipjoint. Looks the same as what it did before
actually..
Took a
little break after the driveshaft struggle and you can really see the sun
beating down on my work area..
(ror95-4a.jpg)
Then I
spent what seems like hours searching for the steel rod thingie which holds the
emergency brake cable on the passengers side.. Couldn’t find the damn thing. I got the emergency brake cables installed into the brackets
and hooked up the actuating wire.
Then out of desperation I flanged up a temporary cable hook thingie out
of some 1/8” steel rod I found laying around.. I bet the real part shows up in a couple days..
Then it
was time to get the rear wheels back on..
At long last! At first I
was fooling with my cross wrench but then the bright idea of getting out the
impact wrench saved me from myself.. I got the wheels back on (on the correct sides)
in a jiffy and it was getting close to the time of getting Rustpuppy back on
the ground.
First I
tested everything by starting Rustpuppy up and running forward and reverse
while Rustpuppy was securely up on the jackstands. Too cool! No
whining and the brakes even work!
I ran her up to about 70mph indicated and everything was smooth as
silk.. I had the driveshaft
straightened and balanced when it was cut and took the tires in for a
re-balance during this project..
Everything checked out good.
Next I
fooled around for quite a long time getting Rustpuppy down from the high
jackstands she had been on so long.
I had to go slow and careful since the stability goes south halfway down
and she is on a hill. She kept
wanting to fall off on the downhill side so I took a lot of precautions.
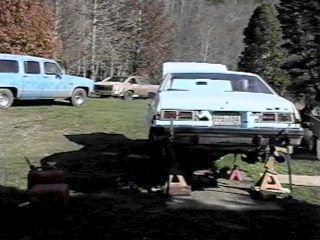
Eventually
she was on her own tires.. I
noticed the long traction bar bumpers were both touching so I think I will swap
back to the cutoff jobs..
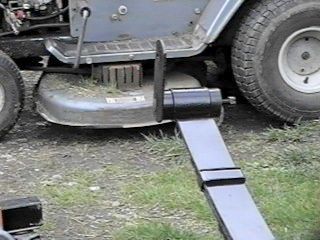
Earlier
today I popped into town for gasoline so I put 5 gallons of premium in the
almost dry tank..
The
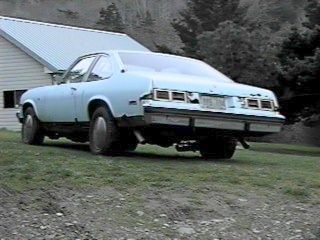
moment of first movement came!
Yowza! It felt
good.. Here is Rustpuppy posed
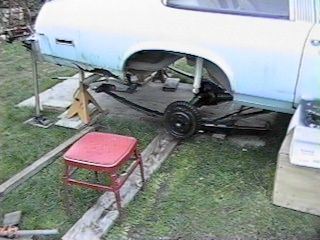
next to the Suburban and Yakima Sue.
Notice the new stock height springs moved the rear up about 1 ½” so
Rustpuppy is level fore and aft instead of dragging her tail..
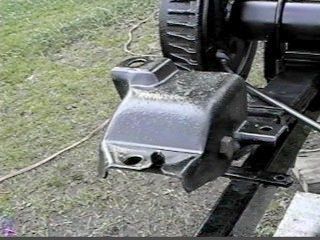
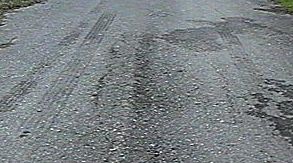
I took
Rustpuppy out on the road for just a little bit. I went just a couple miles. On the way back I tested the positraction feature of the new
axle..
The two
wide black stripes in ror95-6a.jpg are a good testimonial.. (about 8” wide by 15 feet long,
and there are two of them! happy
happy, joy joy...)
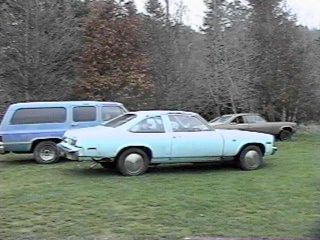
Ror95-7a.jpg
shows the new stance that ol’ Rustpuppy has with them spiffy new ESPO springs..
A good
day. But, (why is there always a but?)
I got sunburned! In Oregon! In February!
I can’t
believe it.. And it was up to 67
degrees this afternoon..
More to come…
Rick
Draganowski
(making
Rustpuppy tracks.. nice
ones.. but my face feels hot..)
END OF
CHAPTER 10
![[ Back Button ]](../gif/t_back.gif)
![[ Go Home Button ]](../gif/t_home.gif)
![[ Next Button ]](../gif/t_next.gif)